How to Create a WordPress Child Theme Step by Step – The Ultimate Tutorial
Learning how to create a WordPress child theme is a crucial skill for anyone who wants to get the most out of their site. Child themes are the safest way to customize WordPress and they allow you to change literally anything about your website.
Creating a WordPress child theme is also a great way to enhance your web design skills and learn more about the WordPress platform. Plus, it’s easy. You can achieve a lot by simply copying and pasting. As a consequence, it’s even feasible for beginners.
In this article, I will give you a step-by-step introduction to how to create a WordPress child theme and use it to customize your site at will. Let’s get started right away, we have a lot to cover.
Why Use a WordPress Child Theme?
Before we get into creating child themes, let’s first talk about their purpose and why you’d want to use them. For that, we need start by talking about WordPress themes in general.
Themes Determine the Design of Your Website
The beauty of WordPress (and one of the main reasons for its success) is that the platform is completely customizable. There’s basically nothing that you can’t change or modify in a WordPress website.
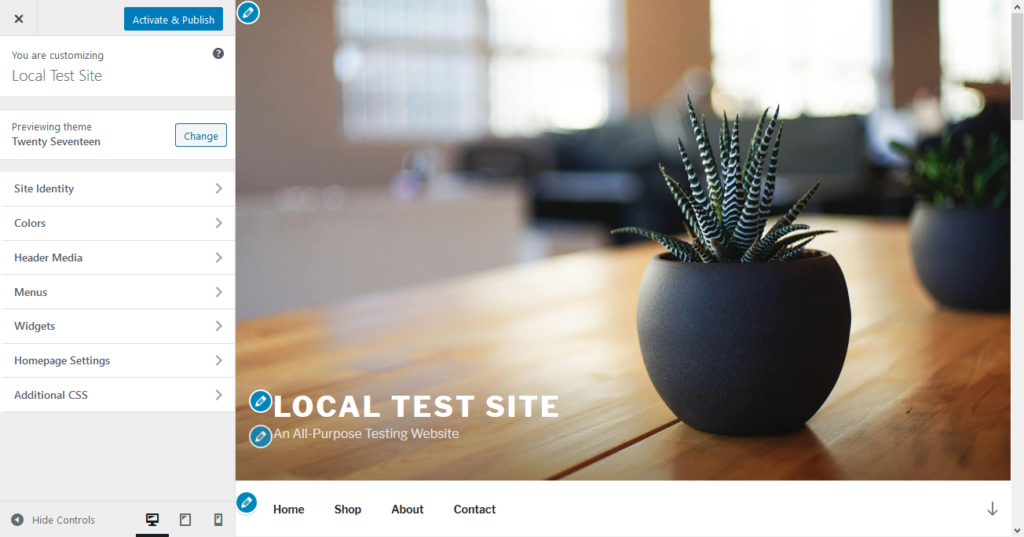
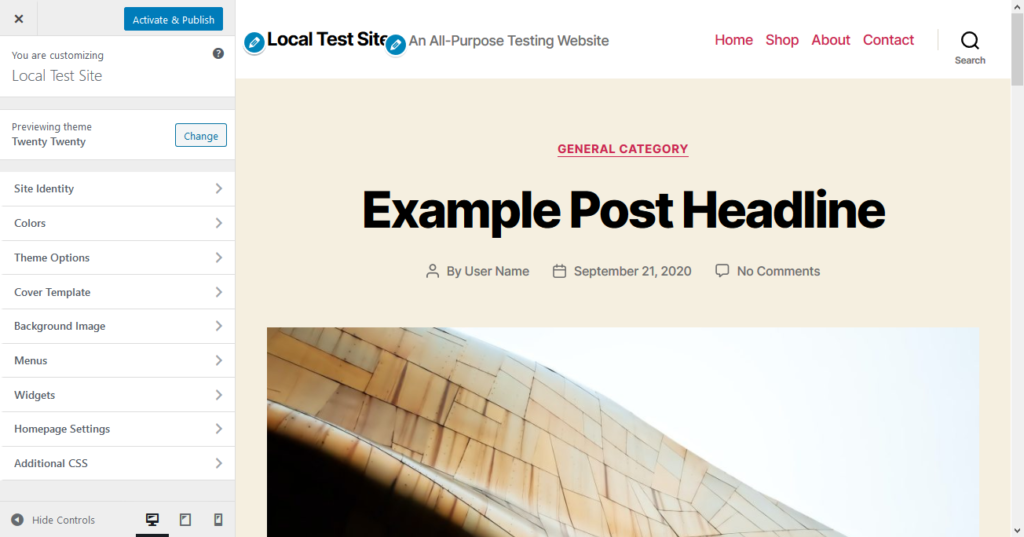
You don’t even have to know code to do so. Plugins and themes allow you to add functionality and change the look and behavior of your site with a few clicks. Just download, install, and – bam – your site works and looks completely different.
In addition to that, themes consist of editable files, so, with some coding knowledge, you can make any changes to your site that you want. However, modifying your main theme directly comes with a lot of problems. And here is why.
The Trouble With Editing Your Main Theme
Many people, especially beginners, make changes directly inside their main WordPress theme (often on a live site with code snippets copied from somewhere around the web, but that’s a whole other article). It’s easy: just use the built-in WordPress editor and modify the necessary files.
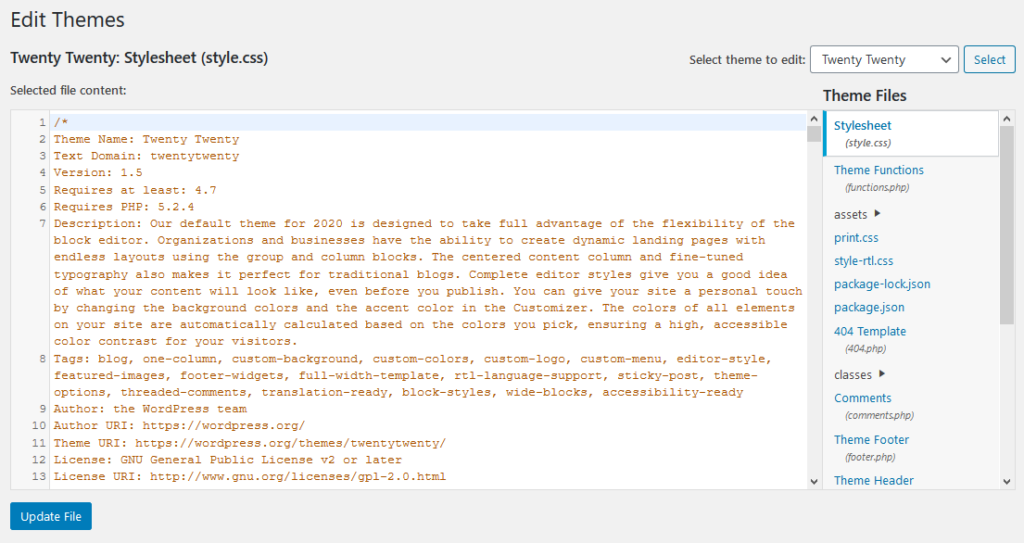
However, that’s not the correct way to do it.
Why?
Because if you do, when an update rolls around (which happens for a well-supported theme), all your changes will be overwritten. That’s right, all your hard work — gone in an instant.
I can tell you from experience, it’s not fun when that happens. In fact, I would bet money that the practice of editing themes directly is one of the main reasons why many WordPress site owners don’t keep their websites up to date (even though it has gotten better in recent years).
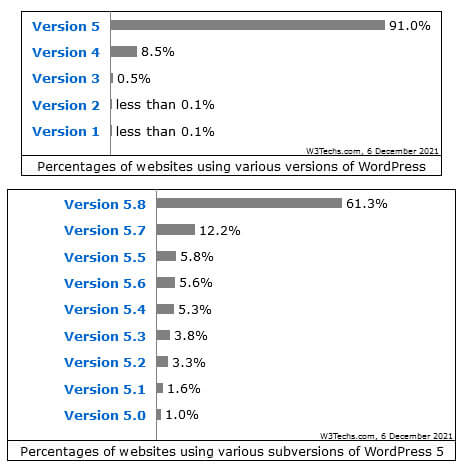
Unfortunately, not updating your site is another bad idea as it threatens your site’s security and creates other issues. However, that’s what you set yourself up for when you edit your themes directly: you either don’t update or lose your changes every time you do. A classic lose-lose situation.
The Solution: Learn How to Set Up a WordPress Child Theme
How do child themes help alleviate this problem? By allowing you to make changes to an existing theme that are independent of the theme itself.
To understand this, we first need to talk about how WordPress child themes work. Child themes are not like normal themes. In fact, they can not function on their own. Instead, a WordPress child theme depends on another theme, their so-called parent. Without a parent theme present, you can’t even activate a child theme in WordPress.
How do they work together?
Basically, whenever your site is loaded, WordPress first looks in your child theme for design and functionality resources. If it can’t find them there, it falls back on the parent theme.
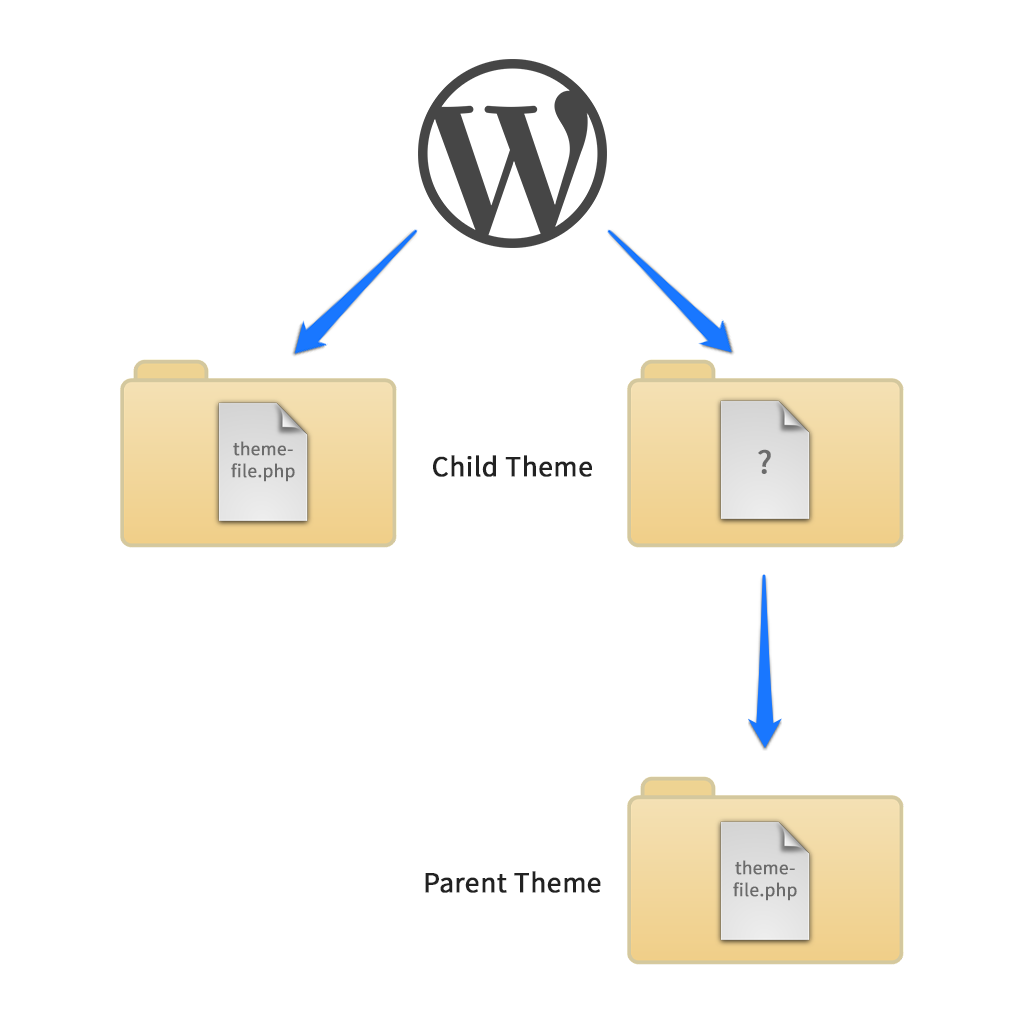
As a consequence, a child theme can modify and add to anything that is already present in its parent. To that purpose, child themes can contain page templates, CSS and JavaScript files, images, and much more (though they don’t have to). With their help, you can alter the parent’s design, functionality, layout, and other aspects without having to create an entirely new theme.
Pretty neat, right?
Basically, if you have ever asked yourself how to update a WordPress theme without losing your customizations, learning how to create a child theme is the answer.
Child Theme vs Parent Theme — What’s the Difference?
In my opinion, child themes are one of the best things WordPress has come up with (and I’m sure at the end of this post you will agree). However, it leaves the question, what theme can be parent theme? The answer: Basically any theme that has all the necessary files to be complete.
Yet, some themes are more suitable than others. For example, the Genesis Theme by StudioPress (now owned by WP Engine) is a theme framework specifically made to be modified by child themes. The main theme is usually only present to provide the basic structure and functionality, everything else happens in child themes (of which they offer many on their site). It’s one of the reason why Genesis is among my favorite online marketing tools and also powering this site.
Advantages of Child Themes (And When to Use One)
As mentioned, the main advantage of using a child theme is that it lets you make changes to your site in a safe way. However, this comes with other benefits:
- Time saver — WordPress child themes eliminate the need to create an entire theme. Instead you can use existing resources and built on top of them.
- Focus on design — You are able to use the sophisticated functionality of theme frameworks and parent themes while customizing the design to your liking.
- Better organization — Keep all your changes in the same place. No need to track them down later in a theme that may contain thousands of lines of code.
- Easily reversible — Switch off all customizations by simply deactivating your child theme.
- Learn by doing — Creating child themes allows you learn more about web design, themes, and the inner workings of WordPress on the job.
So, should you always create a child theme when making customizations to your WordPress site? No.
If the changes you are planning are really small (such as changing a color or a font), a custom CSS plugin may be sufficient (for example, the one contained in Jetpack). You can also use the WordPress Customizer for this.
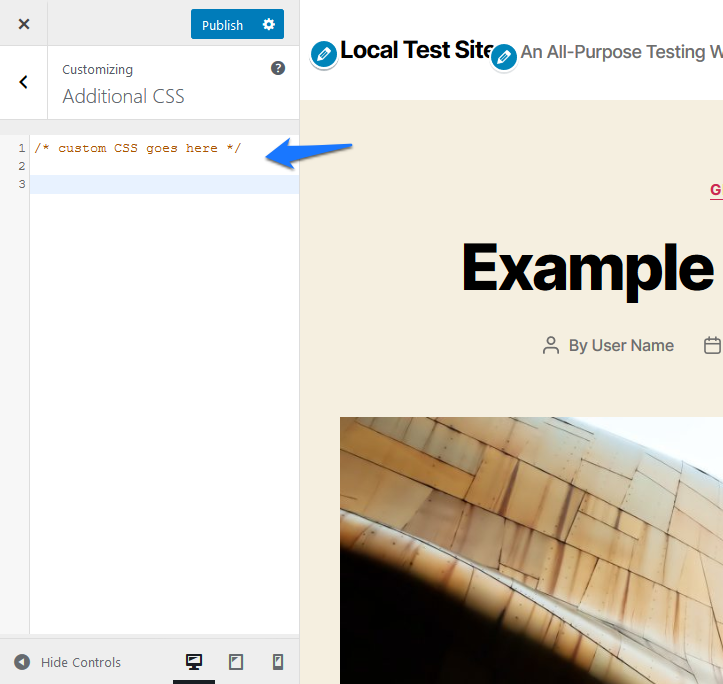
Aside from that, many themes offer ways to input custom CSS out of the box.
However, for larger changes such as modifying your layout, creating new page templates, or similarly elaborate operations, child themes are the way to go.
Are you convinced yet? Then it’s time to learn how to create a WordPress child theme. We will first do the whole process by hand. After that, you will learn how to achieve the same thing with a plugin solution.
How to Create a WordPress Child Theme Step by Step – Without a Plugin
As you will see below, a child theme doesn’t need much. In the end, it comes down to a folder, a style sheet, and a functions.php file. Don’t worry if you don’t know what all of those are yet, you will learn soon enough.
For the example below, I will use Twenty Twenty, one of the default WordPress themes. You can perform the upcoming steps directly on your server via FTP. However, I recommend using a local development environment instead of a live site so you can make mistakes without anyone noticing. After that, simply zip up the child theme and install it via Appearance > Themes just like any other.
Let’s get started.
1. Create a New Folder Inside Your Theme Directory
We will start off with the child theme folder. This needs to be located inside your site’s theme directory. You find it in your WordPress installation under wp-content/themes.

Once you have navigated to this location, all you need to do is right click and create a new directory. The usual practice when creating a child theme is to give its folder the same name as the parent theme appended with -child. That way, anyone knows immediately that this is the child of an existing theme.
However, you can theoretically name the new directory anything you want. Just make sure to adapt the code examples below accordingly. Also, don’t include spaces in your directory name!
I will go the classic route and just call my directory twentytwenty-child.

2. Create the Style Sheet
The next step in your quest to create a WordPress child theme is setting up the style sheet. This is the file that contains your theme’s CSS code. It determines much of your theme’s design.
Themes can have multiple style sheets, but one is enough for us for now. All it takes is to create a text file and name it style.css. That way, browsers know automatically how to use this file.
However, in order to make it work in WordPress, you need to add a style sheet header. That is a piece of code which contains important information about the child theme. Below is an example, which I took from the WordPress Codex.
/*
 Theme Name:   Twenty Fifteen Child
 Theme URI:    http://example.com/twenty-fifteen-child/
 Description:  Twenty Fifteen Child Theme
 Author:       John Doe
 Author URI:   http://example.com
 Template:     twentyfifteen
 Version:      1.0.0
 License:      GNU General Public License v2 or later
 License URI:  http://www.gnu.org/licenses/gpl-2.0.html
 Tags:         light, dark, two-columns, right-sidebar, responsive-layout, accessibility-ready
 Text Domain:  twentyfifteenchild
*/
Here’s what the different lines mean:
- Theme name — The name of your child theme. This will show up in the WordPress back end.
- Theme URI — A website or demo page that belongs to this theme. This or an author’s URI is mandatory for a theme to be accepted in the WordPress theme directory.
- Description — A description of your theme that also shows up in the WordPress back end.
- Author — The theme author’s name. You can put your own name here.
- Template — This part is the most crucial. Here goes the name of the parent theme, meaning its directory name in your theme folder. If this is not correct, your child theme won’t work.
- Version — The version of the child theme, usually 1.0.
- License — The license under which your child theme is available. Themes in the WordPress directory are usually released under the GPL license. You should stick with the same license as your parent theme.
- License URI — A link to a detailed description of your license. Again, just go with what your parent theme says.
- Tags — Tags help others find themes inside the WordPress directory.
- Text domain — Important information for internationalizing your theme and making it translatable. A common practice is to use the URL of your theme in the directory.
If some of this doesn’t seem relevant, it’s because it isn’t — at least not for child themes that will never see the inside of the WordPress theme directory. If you create a WordPress child theme for your private use only, all you really need is a theme name and template. As a consequence, my reduced style sheet header ends up looking like this:
/*
 Theme Name:   Twenty Twenty Child Theme
 description:  A child theme of the Twenty Twenty default WordPress theme
 Author:       Nick Schäferhoff
 Template:     twentytwenty
 Version:      1.0.0
*/
Feel free to copy and use it as a template for your own work.
3. Activate Your Child Theme
Once your directory is in place and the style sheet placed inside, you are already able to activate your WordPress child theme. For that, go to Appearance > Themes. Here, you should find a sight similar to the image below:

To activate your theme, simply hover over it and click on the button marked Activate. That should switch your site’s active theme to your new child theme. However, there is one problem: when you now go to your front end, your site looks something like this:
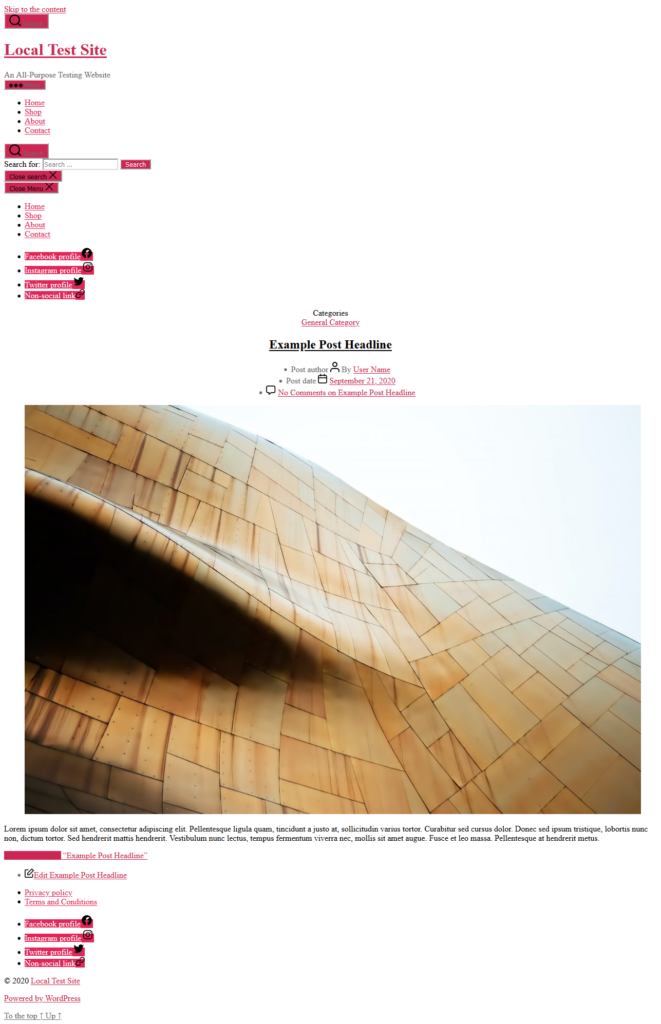
However, no need to hyperventilate, this is expected. Why? Because your site does not have any styles yet. Remember the style sheet we created? It’s empty. As a consequence, your site does not have any styling directions. But don’t worry, we will take care of that in the next step.
So why did I show you how to activate your child theme in WordPress if it’s not ready? Because I wanted to show you that it works with just a folder and an empty style sheet. However, now is the time to make it look good.
4. Create functions.php
In this next step, we will set up your child theme’s functions.php file. This is the part of your theme that allows you to make major functionality changes to your site. It can contain both WordPress functions as well as PHP code. With their help, you can make significant changes to both your site’s look and behavior.
For example, you can use it to create new widgetized areas, add fonts to your site and a lot more. We will go over practical examples further below. For now, however, all you need to do is create another text file and name it functions.php. When you are done, open it and paste the following piece of code:
<?phpThat’s it. For real. All functions.php needs in order to work is an opening PHP tag. Of course, you can add more, however, this will suffice for our needs.
Also, be aware that you can, in fact, create a WordPress child theme without a functions.php file. However, I showed you this step a) so you know how to do it and b) because it is important for the next task on our list.
5. Inherit the Parent Theme’s Styles
As you may recall, your website currently doesn’t look like much and creating functions.php hasn’t done anything about that. However, you will need the file in order to make the child theme inherit its parent’s styling. That way, the site can go back to the way it looked before activating your child theme.
Now, there is more than one way to do this. One is via CSS and the @import rule. You can the line below into your style sheet (not functions.php!) to tell your child theme to use the styles of its parent.
@import url("../twentytwenty/style.css");However, while this works and is easy, it’s not the recommended way. That’s because it can hinder your site’s performance. If you have several style sheets, using @import will force the browser to download them one after the other instead of all at once. This is wasted time and important since 40% of visitors leave if your site isn’t done loading within three seconds.
It’s also one of the reasons we created functions.php. It allows us to use wp_enqueue_style(), a WordPress function specifically made for loading style sheets. For that reason, my child theme’s functions.php looks like this:
// enqueue parent styles

function ns_enqueue_styles() {
    wp_enqueue_style( 'parent-style', get_template_directory_uri() . '/style.css' );
}

add_action( 'wp_enqueue_scripts', 'ns_enqueue_styles' );
Twenty Twenty and other WordPress default themes are set up in a way that anything you add to the child theme’s style.css will execute after the parent styles. This will be important later. If you are having trouble getting this to work in your particular theme, try out this piece of code:
// enqueue parent styles

function ns_enqueue_styles() {

    $parent_style = 'parent-style';

    wp_enqueue_style( $parent_style, get_template_directory_uri() . '/style.css' );
    wp_enqueue_style( 'child-style',
        get_stylesheet_directory_uri() . '/style.css',
        array( $parent_style ),
        wp_get_theme()->get('Version')
    );
}
add_action( 'wp_enqueue_scripts', 'ns_enqueue_styles' );
The snippet above will specifically load the child theme’s style sheet after the parent’s. However, in a theme that is properly set up, this will load the child theme styles twice instead, so only use it if the normal way doesn’t work.
Aside from that, it should work as is. No need to adjust it to your particular setup. Be sure to paste the code at the beginning of your functions file (but after the opening <?php tag). When you save and upload it to your child theme directory, the design should go back to normal.
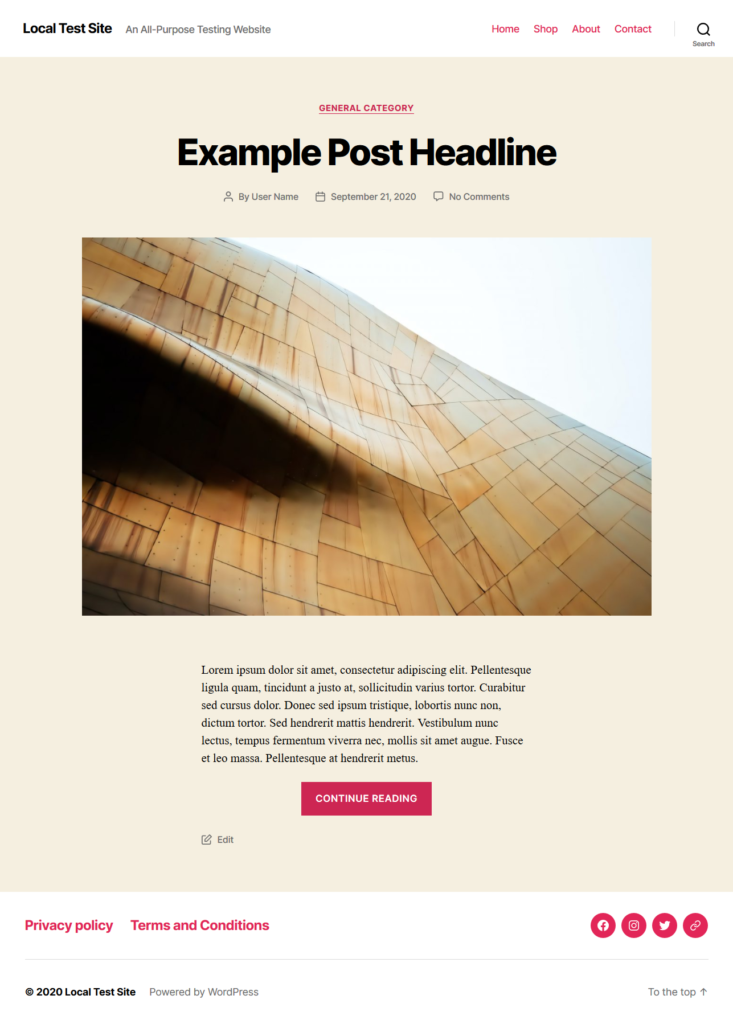
Well done! You just learned how to make your first child theme for WordPress! That wasn’t so hard now, was it? However, for extra brownie points, there is one more thing you can do.
6. Add a Theme Thumbnail
Since we are overachievers around here, we will go the extra mile and add a theme thumbnail. That is the image that shows up inside the theme menu of WordPress.
To do so, all you need is create a PNG file called screenshot.png and add it to your child theme folder. Place it in the folder itself, not in a subfolder.
The easiest way to get one is to take a screenshot of your active theme. In Firefox you can now take screenshots by simply right-clicking on a page or using the Page actions menu and choosing Take a Screenshot.
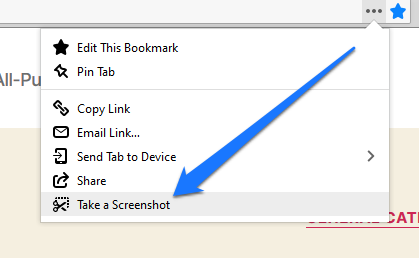
The recommended size is 880×660 pixels though 387×290 is enough. The higher resolution just makes sure it looks good on bigger screens. Also, you can use a JPG or GIF as well, however, PNG is the recommended format.
It might also make sense to add the screenshot after you are done customizing your theme. That way, it reflects the finished work better. How do you customize a WordPress child theme? We will get to that momentarily. However, first we will cover how to create a child theme with a plugin.
Creating a Child Theme in WordPress via Plugin
If you want to use a plugin to create a WordPress child theme, there are several options. These include Child Theme Creator by Orbisius, Child Theme Wizard and Child Theme Generator.
However, by far the most popular is Child Theme Configurator, which is what we will use here. A lot of the process below will be familiar to you because we are doing the same thing as before, only with a plugin. I personally prefer the manual route, however, I wanted to show you this option as well so you can decide for yourself.
1. Install the Plugin
Let’s do this step by step just like we created the child theme manually above. The first thing to do is to get the plugin on your site. For that, go to Plugins > Add New and search for its name or child theme. In both cases, Child Theme Configurator should be the first search result.
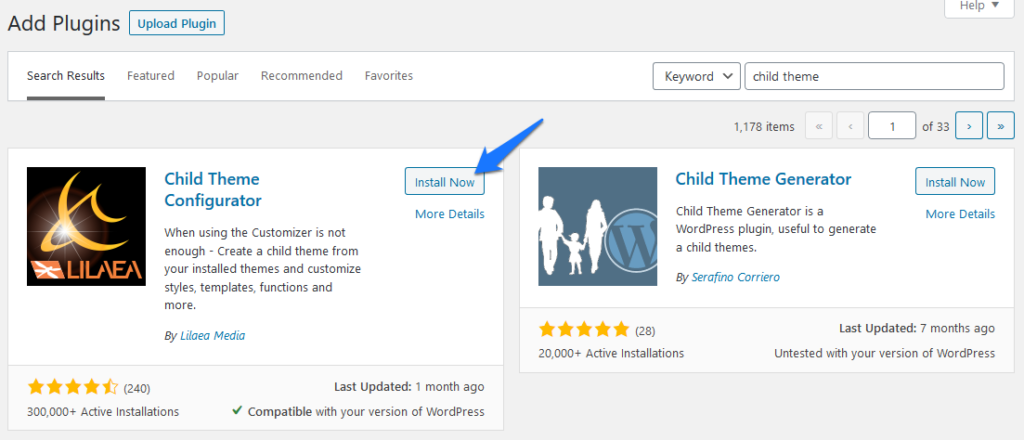
Click Install Now and wait until it’s done, then activate the plugin.
2. Start the Process
After the installation, you find the options for creating a new child theme under Tools > Child Themes:
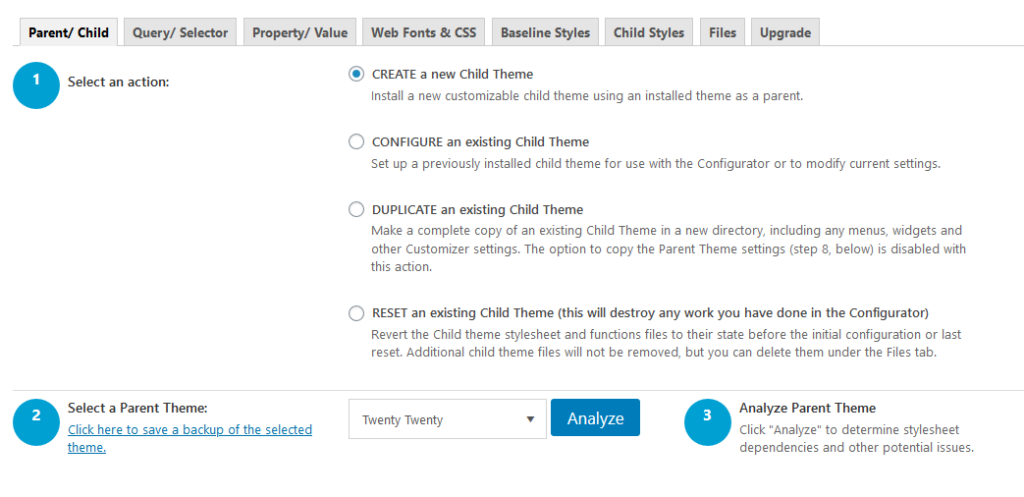
In this screen, first choose the action you want to perform. In this case it’s to create a new child theme. Then, use the drop-down menu below to pick the parent theme (Twenty Twenty in this example). Hit Analyze. The plugin will then check the parent theme for dependencies and potential issues.
3. Complete Settings
After it’s done, it will show you the analysis result and additional options.
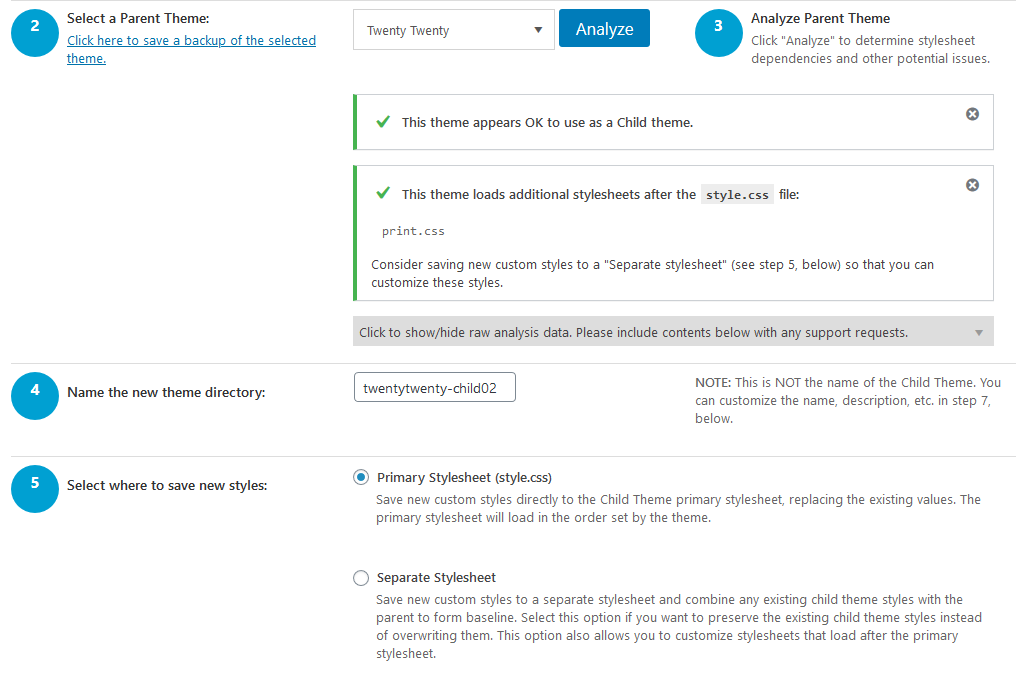
Here’s how to fill them in:
- Name the new theme directory — Pick a directory name for you child theme, for example, twentytwenty-child as in the example above.
- Select where to save new styles — Choose whether to save additional styles to your child theme’s main style sheet or to create a separate one. I leave it as is.
- Style sheet handling — This has to do with importing the parent styles as we talked about earlier. In most cases, it should just stay as is. Pay attention to the Ignore parent theme stylesheets setting when working with a theme framework like Genesis.
- Customize child theme attributes — When you click on the gray box, you can change the child theme name, website, author, and other things that we added to the style sheet header earlier.
- Copy menus, widgets etc. — Lets you overwrite menus, widgets, and other Customizer settings in your child theme with that of the parent. I leave this deactivated.
Once you have filled everything in, hit the big blue button that says Create New Child Theme.
4. Check Your Work
The plugin will then get started. It will create the child theme and also check whether everything appears to be working correctly. In addition to that, it will provide you with a link at the top of screen where you can preview the child theme before activating it. The results should be the same as above.
Aside from that, when you browse to the child theme’s directory on your server, you will see that it contains exactly the same files we created by hand earlier. Inside you will also find a very similar style sheet header and function to enqueue parent styles.
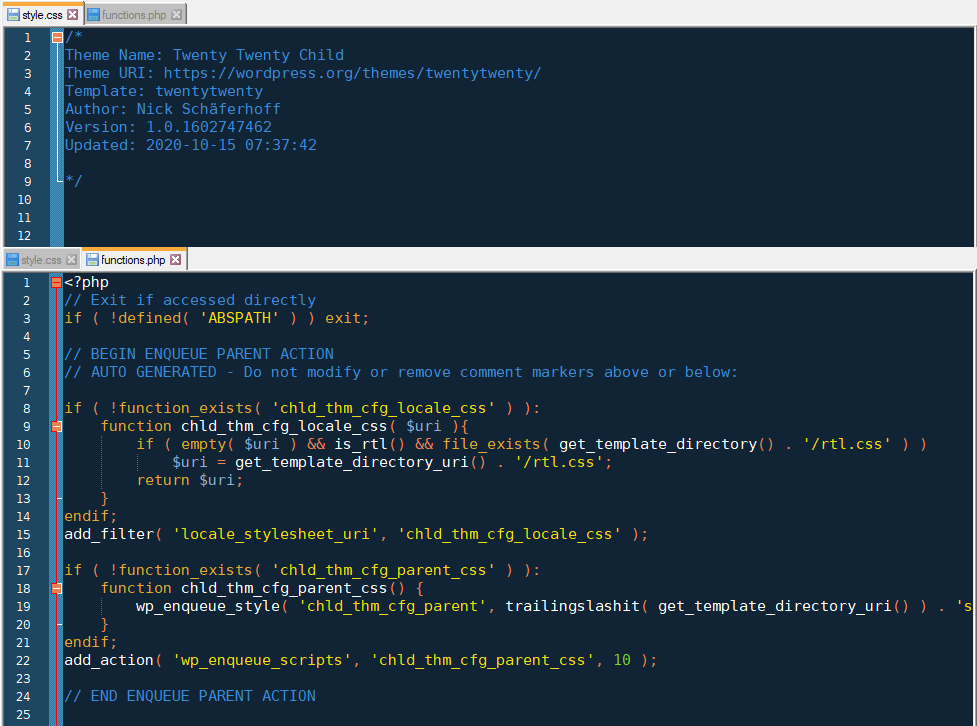
Of course, the Child Theme Configurator plugin offers a lot more functionality to customize your child theme, however, we will opt to do the rest by hand. That way, you understand how things work and can take care of it in the future without depending on a third-party tool.
How to Customize Your WordPress Child Theme
At this point, you might be rightly objecting that your child theme looks exactly the same as its parent. And that’s true, it does. So what’s the point of going through all the steps of creating one?
Well, so far we have only set up the ground work for customizing your WordPress theme. Now we will actually do it. This is where the fun begins.
Adding Custom CSS Styles
One of the easiest ways to customize a WordPress child theme is to edit its CSS. With your style sheet you are able to easily change colors, layouts, fonts, and other design elements. You can even make fundamental changes to your page structure (though, as you will learn, there are better options for some types of changes).
Thankfully, WordPress child themes make this really easy. Add any styles to your child theme’s style.css file and they will override existing markup in the parent theme.
Let’s look at an example. Let’s say, I wanted to increase the height of the main navigation of my test site.
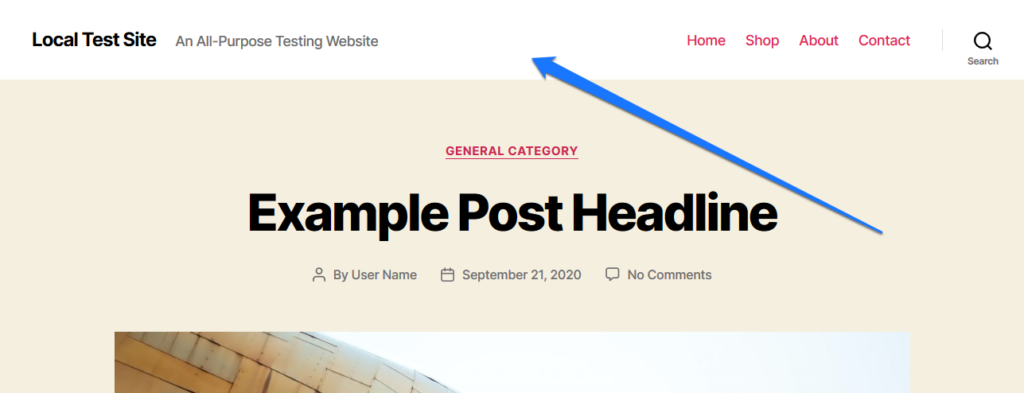
As a first step, I would use the browser developer tools (Ctrl+Shift+C in Firefox, Ctrl+Shift+I in Chrome, or right click and inspect the element in question) to examine the part that I want to change on the page. This would turn up the following CSS declarations.
.header-inner {
    align-items: center;
    display: flex;
    justify-content: space-between;
    padding: 2.8rem 0;
}
In order to make the desired changes, we can change the markup as follows and copy the whole thing to the style sheet of our child theme.
.header-inner {
	padding: 5.8rem 0;
}
And – boom – here is the result:
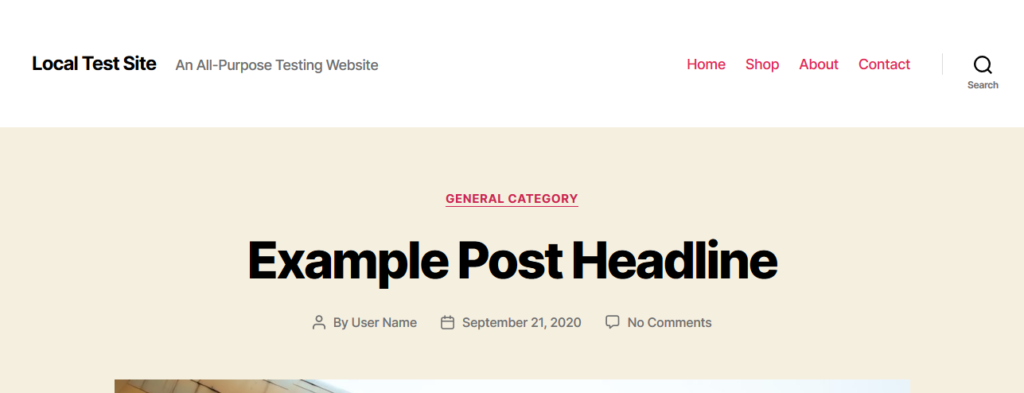
Easy, right? Note that, in case you opted for using the @import option above, you need to add any new styles below that declaration like so:
/*
 Theme Name:   Twenty Twenty Child Theme
 description:  A child theme of the Twenty Twenty default WordPress theme
 Author:       Nick Schäferhoff
 Template:     twentytwenty
 Version:      1.0.0
*/

@import url("../twentytwenty/style.css");

/* post your custom styles here */
Otherwise they won’t overwrite the parent styles. However, by now you should know better than to import parent theme styles via CSS.
Overriding Parent Theme Files
It’s not only possible to modify your site’s styles, you can also replace entire parts of the parent theme.
How?
As mentioned, whenever a theme file is called from the parent directory, WordPress will first check the child theme to see whether a file of the same name exists there. If so, it will use the file in the child theme folder.
As a consequence, whenever you dislike something about your fundamental site layout, you can copy the theme file in question, make modifications, and add it to the child theme directory. From then on, WordPress will use the new template without you having to change the original.
Let’s look at an example to really drive the point home. In this case, I want to move the category link underneath the post meta.
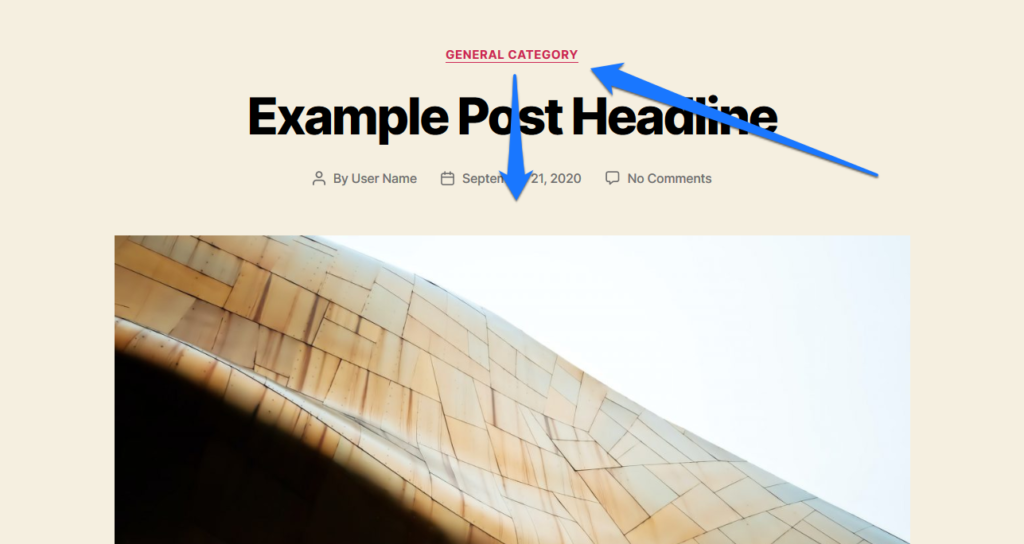
With a little detective work (meaning a look into index.php to see which template is being called on the homepage of Twenty Twenty), I find out that the file responsible for this is located in the parent theme under template-parts/entry-header.php. Here, I find the following code:
<?php

/**
 * Allow child themes and plugins to filter the display of the categories in the entry header.
 *
 * @since Twenty Twenty 1.0
 *
 * @param bool   Whether to show the categories in header, Default true.
 */
$show_categories = apply_filters( 'twentytwenty_show_categories_in_entry_header', true );

if ( true === $show_categories && has_category() ) {
	?>

	<div class="entry-categories">
		<span class="screen-reader-text"><?php _e( 'Categories', 'twentytwenty' ); ?></span>
		<div class="entry-categories-inner">
			<?php the_category( ' ' ); ?>
		</div><!-- .entry-categories-inner -->
	</div><!-- .entry-categories -->

	<?php
}
Now, in order to change the position, I first need to copy the entire file to my child theme. However, and this is is important, I can’t just plop it into the directory and wait for WordPress to figure out the rest. Instead, I need to place the template file I want to modify in the same relative position as it is in the parent theme.
That means, in my child theme directory I create a subfolder called template-parts. Here, I put the copy of my entry-header.php file.
After I have done so, I can make my changes. In this case, I move the code above underneath where it says:
// Default to displaying the post meta.
	twentytwenty_the_post_meta( get_the_ID(), 'single-top' );
?>
I also need to modify it slightly so that the opening and closing PHP brackets are in the right places:
$show_categories = apply_filters( 'twentytwenty_show_categories_in_entry_header', true );

	if ( true === $show_categories && has_category() ) {
		?>

		<div class="entry-categories">
			<span class="screen-reader-text"><?php _e( 'Categories', 'twentytwenty' ); ?></span>
			<div class="entry-categories-inner">
				<?php the_category( ' ' ); ?>
			</div><!-- .entry-categories-inner -->
		</div><!-- .entry-categories -->

		<?php
	}
?>
Now just a little bit of styling (you know where that goes by now):
.entry-categories-inner {
	margin-top: 1rem;
}

.featured-media {
    margin-top: 4rem;
}
And when I now reload the front page of my test website (with the child theme active, of course), I see the modified version.
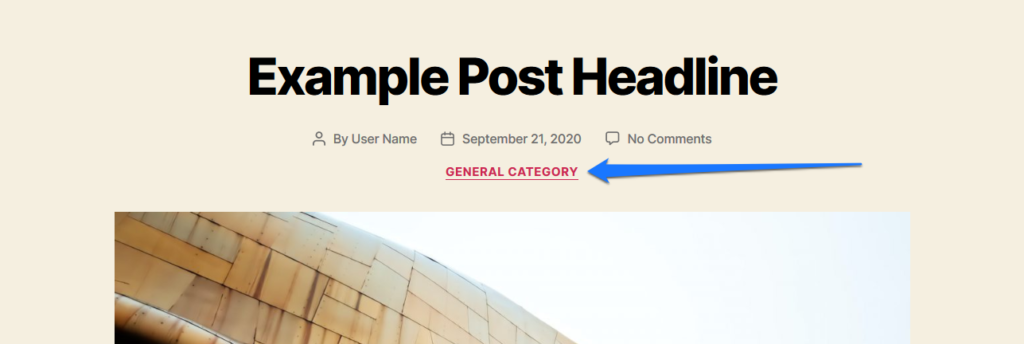
Still not too complicated, is it? After learning how to create a WordPress child theme in the first place, I am sure you can handle it. Plus, you can do the same with pretty much any template file found in your parent theme.
Adding Custom Templates
It’s not just possible to override existing files, you can also add completely new ones. Template files are the most common example here as well. If you are familiar with the WordPress template hierarchy, you can use it to add new layout options to your site.
For example, by default the category pages in Twenty Twenty look like this:

However, I have decided that I want to display my categories in more of a card layout. For that, I am going to do the following:
- Create a custom page template file with custom classes
- Change its CSS to display my content the way I want to
As a first step, I will copy index.php from my parent theme to the child theme and rename it to category.php. That way, WordPress knows to use this page template only for category archives.
After that, I simplify the code as much as possible and wrap the section containing the posts into a new div element with a CSS class called custom-archive added to it. In the end, it looks like this:
<?php

/**
 * Custom page template for archives
 */

get_header(); ?>

<main id="site-content" role="main">

	<?php

	if ( is_archive() && ! have_posts() ) {
		$archive_title = __( 'Nothing Found', 'twentytwenty' );
	} else {
		$archive_title    = get_the_archive_title();
		$archive_subtitle = get_the_archive_description();
	}

	?>

		<header class="archive-header has-text-align-center header-footer-group">

			<div class="archive-header-inner section-inner medium">

				<?php if ( $archive_title ) { ?>
					<h1 class="archive-title"><?php echo wp_kses_post( $archive_title ); ?></h1>
				<?php } ?>

				<?php if ( $archive_subtitle ) { ?>
					<div class="archive-subtitle section-inner thin max-percentage intro-text"><?php echo wp_kses_post( wpautop( $archive_subtitle ) ); ?></div>
				<?php } ?>

			</div><!-- .archive-header-inner -->

		</header><!-- .archive-header -->

	<div class="custom-archive">

		<?php

		if ( have_posts() ) {

			while ( have_posts() ) {

				the_post();

				get_template_part( 'template-parts/content', get_post_type() );

			}
		}
		?>

		<?php get_template_part( 'template-parts/pagination' ); ?>

	</div><!-- .custom-archive -->

</main><!-- #site-content -->

<?php get_template_part( 'template-parts/footer-menus-widgets' ); ?>

<?php get_footer();
The new custom class enables me to target only the elements on archive pages with some CSS.
.custom-archive {
    display: flex;
    padding: 8rem 0 0;
    flex-wrap: wrap;
}

.custom-archive .post {
    flex-basis: 50%;
	padding-bottom: 4rem;
}

.custom-archive h2.entry-title {
    font-size: 5rem;
}

.custom-archive .post-inner {
    padding-top: 4rem;
}
When I now reload the page, the design changes noticeably:

Such is the power of custom page templates. However, before we move on: It’s also possible to create new page templates and apply them manually from the WordPress editor. For that, you need to include a page template header (so that WordPress knows what it is) like so:
<?php
/**
 * Template Name: Full Width Template
 */

// rest of the page code goes here
After that, you can pick the template from the Page Attributes menu in the page editor (Twenty Twenty comes with two custom page templates to choose from out of the box).
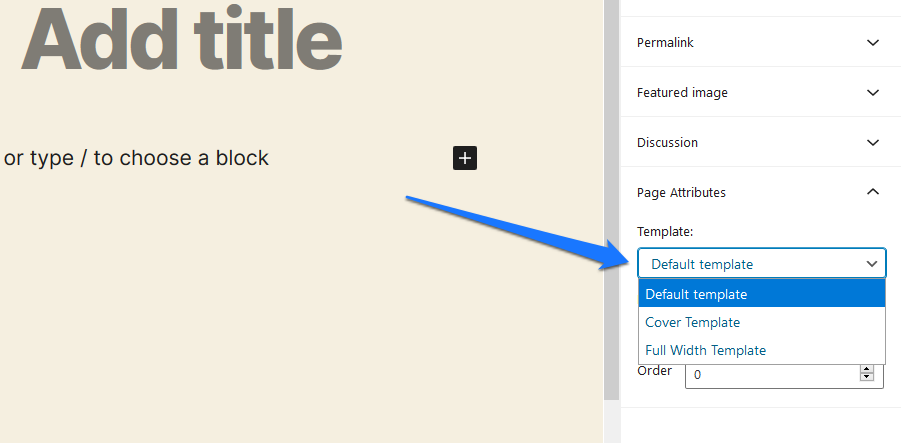
In that case, you also don’t have to call the file page-about.php (in fact, you shouldn’t) but anything you want. Plus, you can assign the template to other pages as well in the same way.
Customizing a WordPress Child Theme via functions.php
We have touched on functions.php before when we learned how to create a child theme in WordPress in the first place. This file allows you to add PHP and native WordPress functions to your site. It’s powerful stuff that enables you to completely customize your WordPress child theme.
One important caveat though: in contrast to style.css, code added to functions.php doesn’t replace the markup in the original but loads in addition to the existing functions.php. In fact, the child theme’s functions.php is loaded right before the parent’s.
That means, if you want to make changes to the original functions, you need to modify rather than replace them. We will talk about that further below when discussing theme hooks. In the meanwhile, let’s look at an example of how you can use functions.php to customize your WordPress child theme.
One of the easiest things to do is create a new widget. For that, simply input this piece of code into your function file:
function ns_create_custom_widget () {
	register_sidebar( array(
	'name'          => 'Feature Box',
	'id'            => 'feature_box',
	'before_widget' => '<div class="feature-box">',
	'after_widget'  => '</div>',
	'before_title'  => '<h2 class="widget-title">',
	'after_title'   => '</h2>',
	) );
}

add_action( 'widgets_init', 'ns_create_custom_widget' );
This will create a new widget area in the back end.
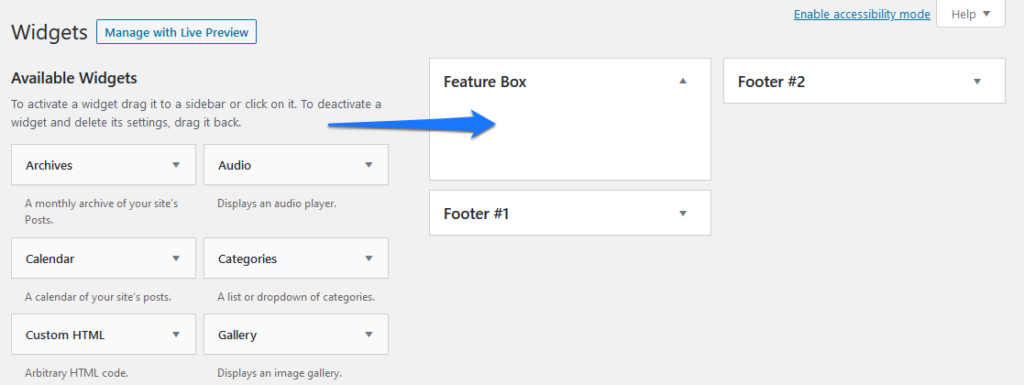
However, how do you get it onto your site? For that, you can use your newly acquired knowledge about how WordPress deals with template files. Just take the code below and input it into a template file where you want the widgetized area to show up.
<?php if ( is_active_sidebar( 'feature_box' ) ) :
	dynamic_sidebar( 'feature_box' );
endif; ?>
For example, I can add a copy of Twenty Twenty’s index.php file to my child theme folder and add the code snippet at the beginning of it.
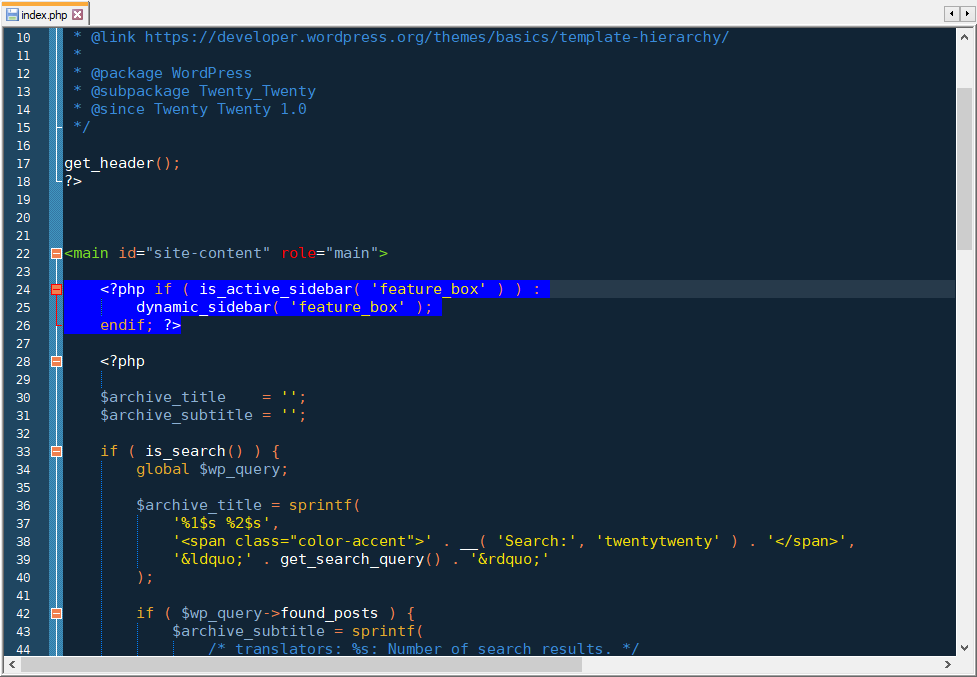
That way, I can use the widget area to add an email sign-up form at the top of my pages.
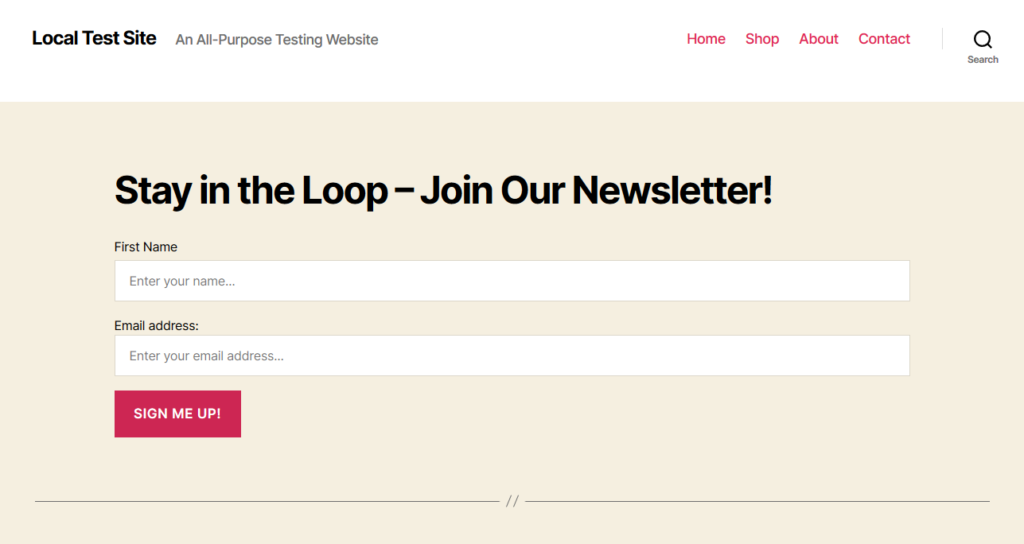
(For funsies, I also included the styled horizontal divider that Twenty Twenty uses between posts. If you want to use it as well, the code is below.)
echo '<hr class="post-separator styled-separator is-style-wide section-inner" aria-hidden="true" />';Admittedly, that needed a little bit of styling to make it look good, but you already learned how to do that, too!
Using Theme Action Hooks
A special way to customize WordPress child themes via functions.php is to use theme hooks. That’s the name for little anchors in your code where you can hook in functions without having to edit files.
We have two main types of hooks: action hooks and filter hooks. The first allow you to add new functionality to existing functions, while the second are a way to modify code that already exists on your site.
Let’s look at an example to make things clearer. First, an action hook.
Remember the widget area we just created? Instead of copying it into the template file, we can also add it to your site via a hook.
For that, I first have to create the hook itself. WordPress has a lot of standard hooks and many themes (especially Genesis) come with even more. However, Twenty Twenty happens to not have one in the place I need. Time to change that.
First, I put this piece of code into my page template where I want the widget to show up.
<?php feature_box_hook(); ?>Next, I have to define this function as a hook. Nothing easier than that, thanks to the do_action() function. I simply paste this into functions.php:
function feature_box_hook() {
	do_action( 'feature_box_hook' );
}
From now on, I can use the feature_box_hook() function to add anything I want to the page. To include my widget area, I can use the same code as before, however, this time wrapped into an action hook.
function ns_add_feature_box () {
	if ( is_active_sidebar( 'feature_box' ) ) :
		dynamic_sidebar( 'feature_box' );
	endif;
}

add_action( 'feature_box_hook', 'ns_add_feature_box' );
And that’s it. This achieves the same effect as pasting the code directly into the page template and it’s how action hooks work.
Child Theme Customization via Filter Hooks
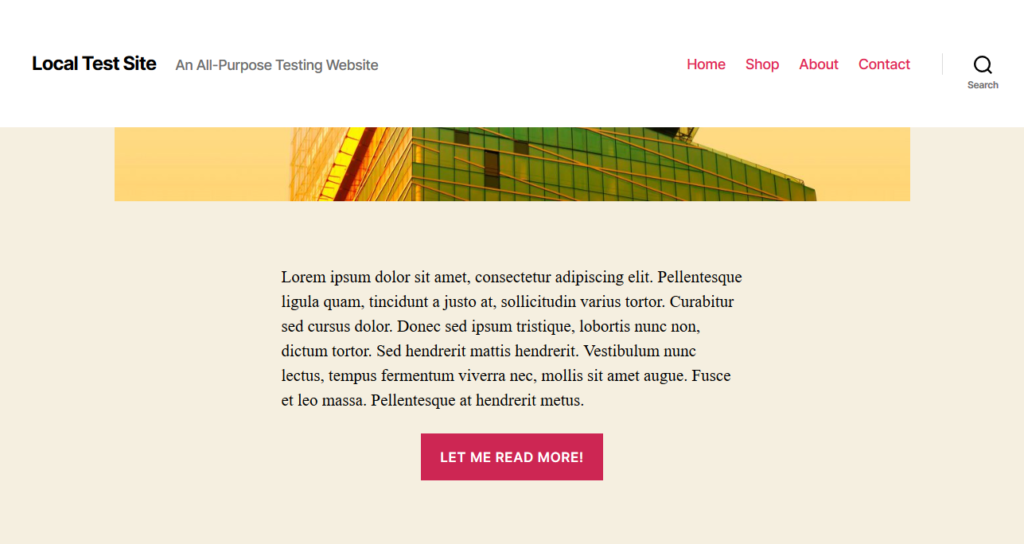
One of the easiest ways to demonstrate a filter hook is to change the content of the “Continue reading” link at the end of your post excerpts.
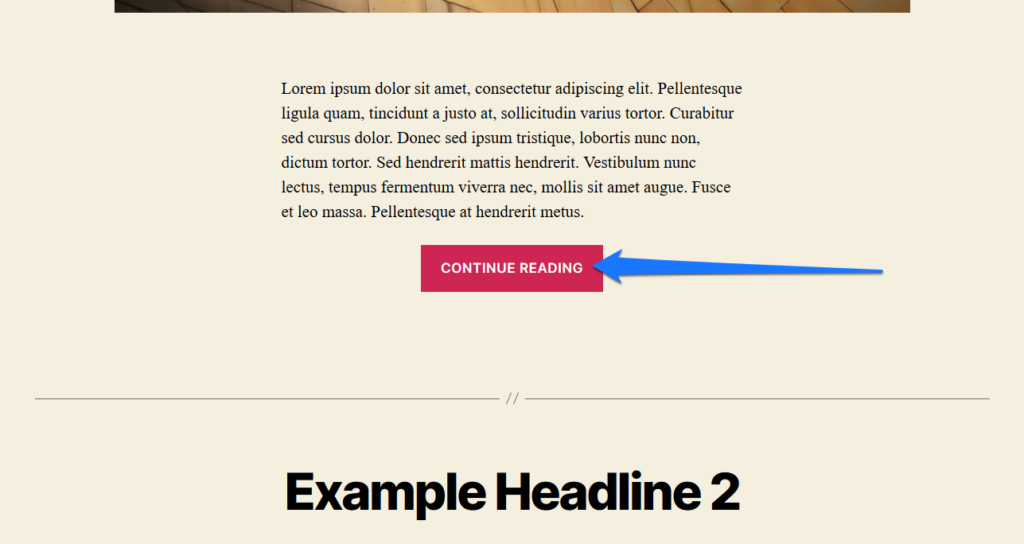
To do so, just input this piece of code into your child theme’s functions.php.
function ns_modify_read_more_link() {
	return '<a class="more-link" href="' . get_permalink() . '">Let me read more!</a>';
}

add_filter( 'the_content_more_link', 'ns_modify_read_more_link' );
Here is the result:
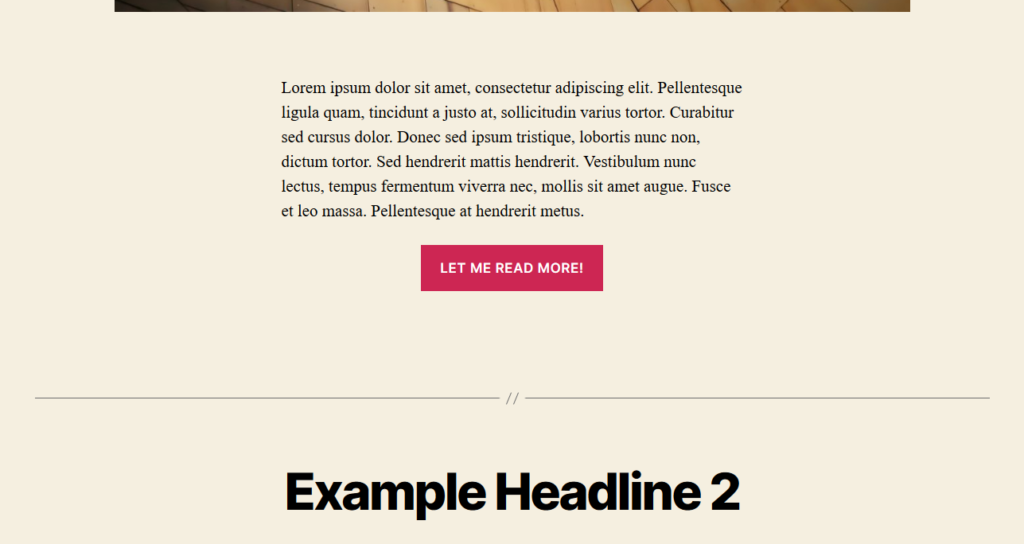
Change the part where it says “Let me read more!” to your desired text.
The hook here is the_content_more_link. It’s a piece of code that’s built into WordPress core and contains the read more link. Via add_filter you can hook into it and change what it does.
For more information on WordPress theme hooks, read this article I wrote for TorqueMag on this topic.
Including JavaScript Files in Your WordPress Child Theme
Of course, you can also use functions.php to add JavaScript files to your child theme. I will first show you how to add JavaScript code, then how to replace JavaScript files from the parent theme.
Naturally, the best way to show this is via an example. In this case, we want to create a fixed header. This is actually quite easy in Twenty Twenty, you just need a small piece of CSS.
#site-header {
    position: fixed;
    width: 100%;
}

#site-content {
    padding-top: 16rem;
}
However, since we enlarged the header earlier, it now takes up way too much space when scrolling down the page.
Luckily, we can correct this with a little bit of JavaScript. For that, the first step is to create a file named shrink.js and place it inside a folder called scripts inside the child theme directory. Then, we put this piece of code inside of it:
jQuery(document).ready(function($) {
    $(window).scroll(function () {
        if ($(window).scrollTop() > 150) {
            $('header').addClass('shrink');
        }
        else{
            $('header').removeClass('shrink');
        }
    });
});
Basically, all this script does is add a CSS class called .shrink to the element named header if the screen scrolls down more than 150 pixels.
Next up, we need to enqueue the script so that is actually loads. We do that inside functions.php with this snippet:
function ns_load_scripts() {
	wp_enqueue_script('jquery');
	wp_enqueue_script('header-shrink', get_stylesheet_directory_uri() . '/scripts/shrink.js', false, '1.0', true );
}

add_action( 'wp_enqueue_scripts', 'ns_load_scripts' );
You will probably probably notice the wp_enqueue_script function. This is similar to wp_enqueue_style, which we used earlier to call on the parent’s style sheet. Only this one is used for scripts, not CSS files.
Note that the snippet above also loads the jQuery library, since the shrink.js script won’t work without it and Twenty Twenty does not have jQuery active by default. If jQuery is already available in your theme, you don’t need to load it again and can delete that line.
In addition, pay attention to the the true argument I used at the end of the wp_enqueue_script function. This makes sure that the script loads in the footer of my pages. Because it needs jQuery to work, it’s necessary that it is initialized after the jQuery library. Makes sense, right? You can do the same thing with any other script you’d like to include on your site.
After that, we just need to add the CSS that changes the styling of the header once the .shrink class is added to it.
.header-inner {
	padding: 5.8rem 0;
	transition: all 0.5s ease-in-out;
	-moz-transition: all 0.5s ease-in-out;
	-webkit-transition: all 0.5s ease-in-out;
	-o-transition: all 0.5s ease-in-out;
}

#site-header.shrink .header-inner  {
	padding: 1.8rem 0;
	transition: all 0.5s ease-in-out;
	-moz-transition: all 0.5s ease-in-out;
	-webkit-transition: all 0.5s ease-in-out;
	-o-transition: all 0.5s ease-in-out;
}
The parts where it says transition makes sure that the styling doesn’t just switch from one size to the other but does so with a gradual animation. Otherwise, here is what it looks like:

Not bad, right? Plus, you now know how to use JavaScript inside a WordPress child theme!
Replacing JavaScript Files of the Parent Theme
Sometimes you will find yourself wanting to replace a script in the parent theme with something else. However, unlike PHP files and CSS styles, child themes don’t automatically overwrite JavaScript. If you include a script in your child theme, it will run in addition to existing ones — unless told otherwise.
So, in order to replace a script included in the parent theme, you first need to deregister it and then register the replacement. That’s what I will show you now.
In Twenty Twenty, most JavaScript is in one single file called index.js. It’s located in assets/js. For this example, I will pretend that I want to move the file to my child theme so I can make changes to it if I need to.
This isn’t how you would usually do it, however, the Twenty Twenty theme does not have a lot of front-end scripts, so I am employing this hypothetical use case to show you how it’s done.
Here’s how you would go about deregistering the existing script:
function ns_deregister_indexjs() {
	wp_dequeue_script( 'twentytwenty-js' );
	wp_deregister_script( 'twentytwenty-js' );
}

add_action( 'wp_enqueue_scripts', 'ns_deregister_indexjs', 11 );
After that, you can register it again and execute it in the child theme like this:
function ns_load_indexjs_from_child() {
	wp_register_script('indexjs-child', get_stylesheet_directory_uri() . '/scripts/index.js');
	wp_enqueue_script('indexjs-child');
}

add_action('wp_enqueue_scripts', 'ns_load_indexjs_from_child', 12);
Alternatively, it’s also possible to do both in one function:
function ns_move_indexjs_to_child() {
	wp_dequeue_script( 'twentytwenty-js' );
	wp_deregister_script( 'twentytwenty-js' );

	wp_register_script('indexjs-child', get_stylesheet_directory_uri() . '/scripts/index.js');
	wp_enqueue_script('indexjs-child');
}

add_action('wp_enqueue_scripts', 'ns_move_indexjs_to_child', 11);
If you use the code from this example, be sure to adjust the location of your replacement file.
One important thing: if you are trying to deregister a parent function but it’s not working, check for priorities. If your parent function has a priority, you need to include a higher priority in your child function to make sure it executes later. It’s only logical, you can’t dequeue a script that hasn’t been queued yet.
So, if the parent function is add_action( 'wp_enqueue_scripts', 'twentytwenty_scripts', 15 );, you need to remove it in the child theme like add_action( 'wp_enqueue_scripts', 'ns_deregister_scripts', 20 );.
Understood? Cool.
Alright, that’s it for customizing WordPress child themes. With the knowledge above, you are now ready to modify any part of your WordPress child theme you wish to change. All that’s left now is to go over some troubleshooting tips in case something’s not working right.
Is Your WordPress Child Theme Not Working? – Common Problems and Their Solutions
As you have seen above, it’s not all that hard to create a WordPress child theme. You can achieve a lot with simple copy and paste. Plus, if you have done it once, you can do it again as often as you want.
However, you might find yourself in the thankless position that you just went through the entire step-by-step tutorial on how to create a child theme in WordPress but it ends up not working properly. If that’s the case, in this last part, I have compiled some common issues people encounter when working with child themes and tips on how to solve them.
WordPress Child Theme Not Loading style.css
One typical problem is that the style sheet of the child theme doesn’t load. No matter what you input, it never manifests on your site. In that case, there are several options to find out what’s going on:
- Check your call inside
functions.php— Coding is fickle. Leaving out just a semicolon or other small element can mean the whole thing does not work. So, the first thing to check when your CSS doesn’t work is your style sheet call infunctions.php. Does it point to the right place including any subfolders? Is there some other problem with it? Always check the basics first. - Review the parent theme architecture — Some themes don’t use a singular
style.css. Instead, they use several CSS files in different directories. In that case, you need to make sure to maintain the dependencies of the parent and enqueue the style sheets accordingly. This means if the parent theme style sheet has a different name and resides in a subfolder of the theme (e.g.css/main.css), you need to do the same in the child theme and use the path when you enqueue the parent styles. - Change the priority — If you don’t enqueue parent and child styles in the same function (thus determining their order), it can sometimes happen that the parent styles load after the child styles. In that case, they will overwrite the changes from your child theme instead of the other way around. A possible remedy for this is to change the priority of the function calling for the child’s
style.css. For that, add a third parameter to the function like so:add_action( 'wp_enqueue_scripts', 'ns_enqueue_styles', 11 );. Notice the 11 at the end. Since 10 is the default priority, this means this function executes later than everything else. Try even higher numbers if it’s still not working.
Child Theme CSS Not Overriding Parent
Another common problem to run into is that the style sheet is obviously loading (for example, it appears in the source code of the page) but your changes still don’t show up. In that case, it could be one of the problems below.
- Your CSS selector is not specific enough — Sometimes when trying to override a style, you need to use a very specific CSS selector to change an element. For example, if you use
.navigation-top ainside your child theme’s style sheet but the parent theme uses.navigation-top li a, the parent styles are more specific. Therefore, the child theme won’t override them. To solve this, you need to use either the same selector or a more specific one to successfully override the parent styles. Check out this post for more information on this topic. - You are importing parent styles at the end of your style sheet — If you are using
@importto load your parent styles (which I have repeatedly advised you against, but oh well), make absolutely sure that the@importrule is placed at the beginning of the child theme’s style sheet. If placed at the end, it will just load the parent styles after the child styles and thus override them. - Caching gets in the way — If you have a caching plugin active (or a CDN — Content Delivery Network), it can sometimes keep the browser from recognizing changes. In that case, try switching caching off. You don’t need it until your site is live anyway.
Child Theme functions.php Not Working
After the style sheet, functions.php file is also sometimes a source of error. Here’s what to check if you think that’s the problem.
- Missing opening PHP tag or wrong position — Similar to the style sheet’s
@importrule, forfunctions.phpthe<?phpis an important marker. It defines where the file begins. Consequently, adding anything before this point will not execute in your theme and might actually end up printed on your site. - Wrong priority — We already talked about priority for style sheet problems earlier. It can also be in issue for other functions in your file. Since parent functions execute after child functions by default, they can override the latter. To stop this from happening, you need to increase the priority of child functions to make them execute later.
- Missing priority when removing parent functions — If you are trying to replace a parent function but it’s not working, be aware that you need to include any priorities present in the original. So if the parent function is
add_action( 'widgets_init', 'parent_function', 15 );, you need to remove it in the child theme likeremove_action( 'widgets_init', 'parent_function', 15 );for it to take effect.
Child Theme Template File Not Working
Finally, you might find yourself in the situation that your child theme doesn’t seem to override parent files. In that case, here’s how you might solve it:
- Targeting anything else than template files? — First of all, you need to realize that overriding only works for template files. That means files that provide structure to the display of pages. They have strict naming conventions, which you can find out in the template hierarchy. It’s not possible to just arbitrarily override any PHP files in the parent theme by including a modified copy in your child theme.
- Check file names and paths — If overriding is still not working, there is likely something wrong with your file name or the path of the file. Be aware that, in order to override a parent file, the child file needs to have the exact same name (or a more specific name, see the hierarchy) and also reside in the same relative location as in the parent theme. So, if the file is in a subfolder in the parent theme, it needs to be in a subfolder of the same name in the child theme.
WordPress Child Themes in a Nutshell
Child themes are one of the best features of WordPress . They allow you to modify themes in a way that is safe, flexible, and highly economical. For that reason, learning how to create a WordPress child theme is one of the first things to do when diving deeper into working with WordPress.
Above you have learned everything there is to know about this topic. We have talked about when it makes sense to use a child theme and when other solutions are more appropriate. We have gone over how to create a WordPress child theme step by step with and without a plugin. After that, we have looked at the many different ways to customize it and also covered troubleshooting tips for when you find your WordPress child theme not working.
By now, you have probably realized that creating a child theme is not hard. In fact, it needs very little, just a directory and two files. However, with this simplicity comes a lot of possibility. You can use child themes to completely revamp your site without having to modify any core or parent theme files. From single styling changes to functions and whole template files, there’s nothing you can not modify or add to your site.
With the information above, you now have the power to truly make your site your own. Plus, you know how to update your WordPress theme without the fear of losing your customizations. I’m looking forward to hearing what you use your new skills for. Also, if anything is unclear in this article, please feel free to drop me a line in the comments or get in touch. I’d be happy to help.
What do you use WordPress child themes for? Anything to add to the above? Let me know in the comments section below!

Leave a Reply