
SEOPress Plugin Review: A Deep Dive Into Every Feature
We have made it. This is the final entry of the WordPress SEO plugin review series. And in this last installment, I will review SEOPress.
In contrast to other entries in this series (Yoast SEO, All in One SEO, The SEO Framework, Squirrly SEO, Rank Math), the plugin user base is relatively small. At t the time of this writing, is has 100,000+ active installations.
However, those who use SEOPress seem to really love it: 95% of ratings are five stars. Let’s see what they are so excited about.
SEOPress: Setup and Options
I don’t think I have to tell you how to install SEOPress at this point. Just go to Plugins > Add New, search for it by name, and click Install Now and Activate in succession.
Once active, there isn’t that much happening at first. The only changes are new menu items that show up in the WordPress sidebar and admin bar called SEO (including an icon which, I assume, is a top view of the USS Enterprise).
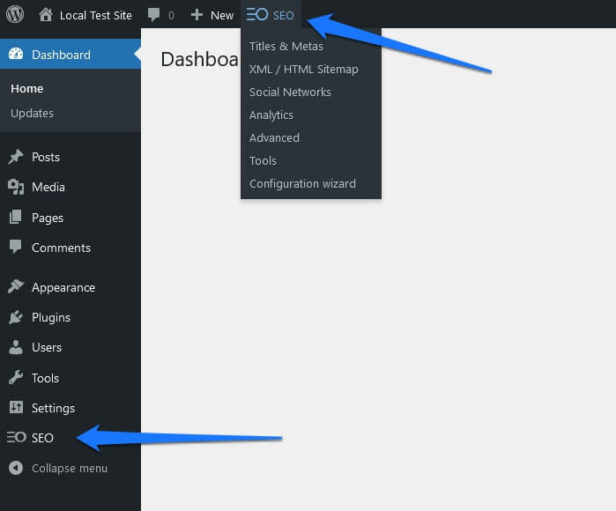
When you click on either of them menu item, you will find several calls to action to start the configuration wizard. As you can see above, that option is also present in the admin bar menu.
Configuration Wizard
When you click on one of the link, the plugin guides you through its setup process.
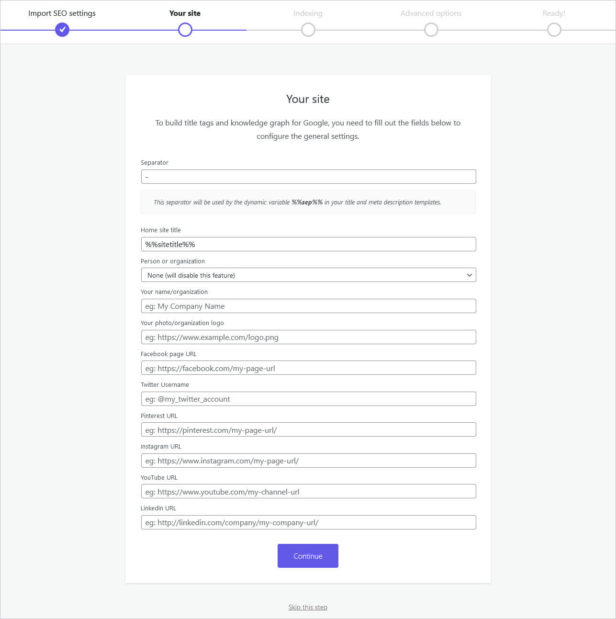
Here’s what that involves:
- Import data from other SEO plugins
- Set up the title tag structure and Knowledge Graph data (separator, homepage site title, whether you are a person or organization, name and logo, social handles)
- Ability to set content types and taxonomy archives to
noindex - Stop author archives from being indexed, redirect attachment pages to file URLs, remove the
/category/base from archive URLs, and configure which SEO column data to display in content lists
In the last step, you have the option to buy the pro version, configure your XML sitemap, review SEOPress’ plugin settings, visit the knowledge base, or go to the plugin dashboard. We will opt for the latter.
Main Dashboard
Here’s what the main dashboard looks like:
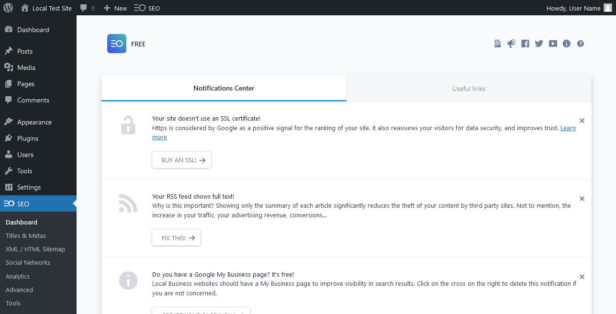
The first thing to notice is the very pleasant and clean design. It’s reminiscent of what Rank Math has done.
In the upper right corner, you find a number of icons that link to useful resources: the plugin changelog, its Facebook group, and the knowledge base. There is also a Useful Links tab that leads to the SEOPress blog, Google disavow tool, website speed test, and Google campaign builder tools.

However, the two most important parts here are the Notifications Center and feature panel at the bottom. Let’s start with the first.
The SEOPress Notification Center
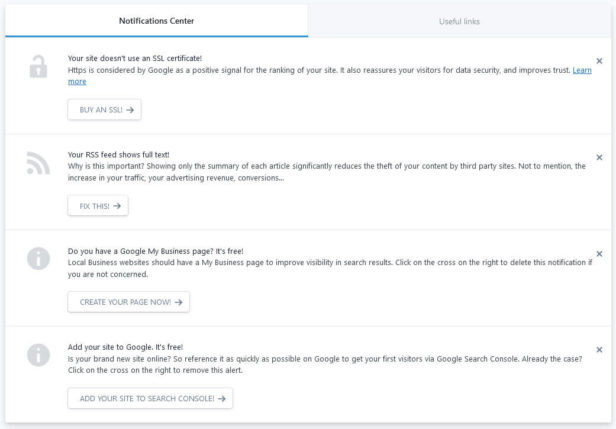
As you can see above, in the notifications center, you find a list of actions to take to make your website better and more SEO optimized. These range from setting up an SSL certificate, over increasing the number of posts on your homepage, to adding your site to Google Search Console. There are also buttons that take you to where you can make those changes. Close any tasks you are not planning on doing with the little x on the right.
Overall, this feature is a really nice touch and reminds me of the SEO tips that Squirrly SEO displays on their dashboard.
Feature Controls
Below that, you find options to enable and disable different plugin features.
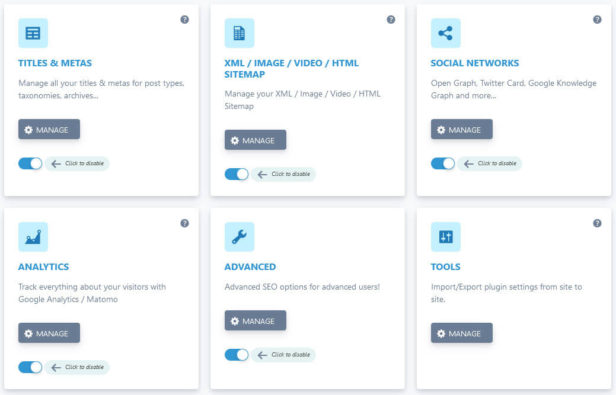
They are set up in a modular fashion just like in other plugins. Click on the little question mark icons in the upper right corners to be taken to articles about each particular feature. A click on Manage takes you to the plugin menu on your site. The slider is, naturally, to toggle the features on and off. As you will see, they also exist at the top of each submenu.

Alright, so far so good for the overview, let’s review which main features SEOPress has to offer its users.
Standout Feature: SEO Metabox and Content Analysis
For this WordPress SEO plugin once again, the highlight is its on-page content analysis and the ability to set SEO titles and meta descriptions. Like in other plugin examples, you find it in the WordPress editor screen. However, unlike other plugins, the options are not part of the sidebar but only appear as a meta box at the bottom of the screen.
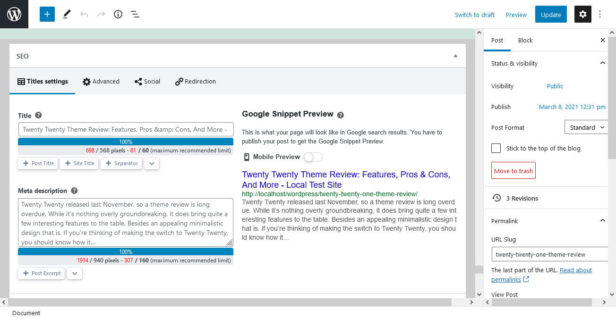
On the one hand, that’s good, as you find all information easily accessible in one place (and there is a lot of it). On the other hand, it makes it a bit more tedious to implement the plugin’s recommendations as you will potentially need to scroll back and forth a lot.
Let’s go through the entire panel step by step.
Customize Your Search Appearance
At the top, you have the usual options to enter a custom title and meta description for appearance in search engines. If you haven’t entered anything, the plugin gives you preview of what they will contain based on your global settings. You also have indicators for the title and description length in both percentage, pixels, and characters. This helps you avoid making them too long or short.
In addition, on the right you see a rendered preview of what the content will look like in Google with the option to toggle between desktop and mobile view.
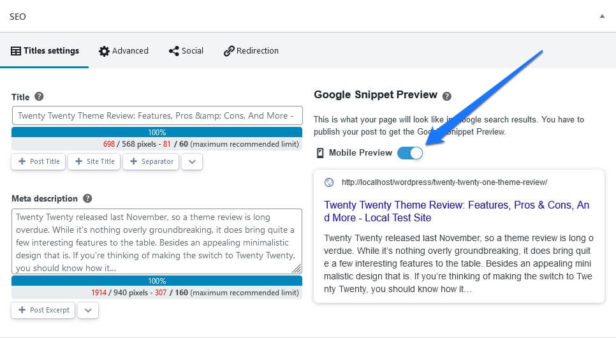
If you want to set a custom title and description you have two options: either write a custom entry by hand or use variables to have SEOPress generate them automatically. For the latter, the plugin will display the most common variables like post and site title that you can enter with a simple click. Alternatively, the drop-down menu contains additional options so that you can make up your own structure.
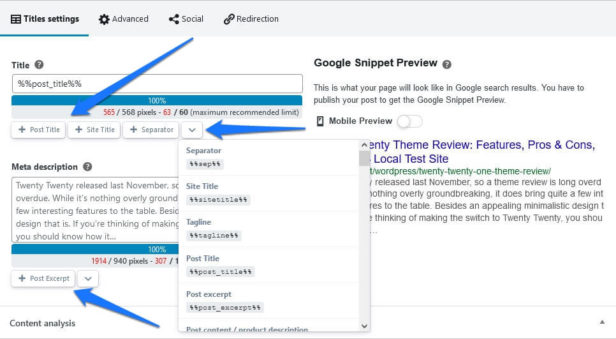
When you use variables, you will see only them in the title and description field. Use the preview on the right to make sure they are as you would like them.
Use the Content Analysis to Improve Your Content
Below that section, you find the content analysis tool. It works as usual: enter one or more keywords into the Target keywords field and hit Analyze my content. SEOPress also recommends saving your post to get the most accurate analysis to review.
When you do, the plugin displays a long checklist of on-page SEO markers including red, yellow, and green indicators for how your content is performing in each area.
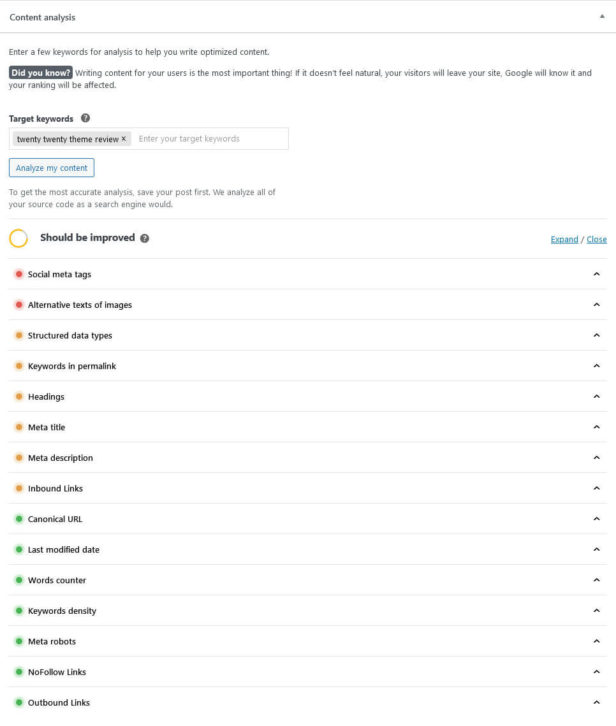
Click on each to get more information on what exactly the problem is (if there is one). Alternatively, use the Expand and Close links in the upper right corner to open or close them all at once.
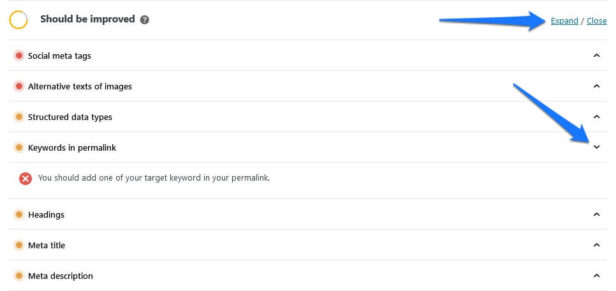
Here’s all the information that SEOPress checks for:
- Headings — Presence of the focus keyword in headings of different orders and the number of occurrences
- Structured data types — If there is any Schema data associated with this particular piece of content
- Meta title — Length of the custom title and whether you have the focus keyword in there
- Meta description — Length and keyword presence for the meta description
- Inbound links — Incoming internal links to this post or page from other content on your website
- Canonical URL — If a canonical URL is present in the source code
- Last modified date — Checks whether the content has been updated in the last year in order to keep it fresh
- Words counter — Content length and unique words
- Keywords density — Number of times the focus keyword appears and the keyword density in percent
- Keywords in permalink — If the focus keyword appears in the post or page URL
- Social meta tags — Presence of an Open Graph title, description, image, URL, and site name, as well as a Twitter title, description, and image
- Meta robots — Checks if meta tags like
noindex,nofollow,noarchive,nosnippet,noimageindex,nositelinkssearchboxhave been set for this particular piece of content (more info below) - Alternative texts of images — Checks if all images on the page have ALT tags filled in
- NoFollow Links — Presence of links set to
nofollowon the page - Outbound Links — The number of outbound links and anchor texts used
Take Control of Social Appearance
Besides the appearance in search engines, you can also control what your content will look like in social networks. In this case that is namely Facebook and Twitter. However, a lot of other networks use the Facebook information as well. You can review the settings that under the Social tab in the SEOPress metabox.
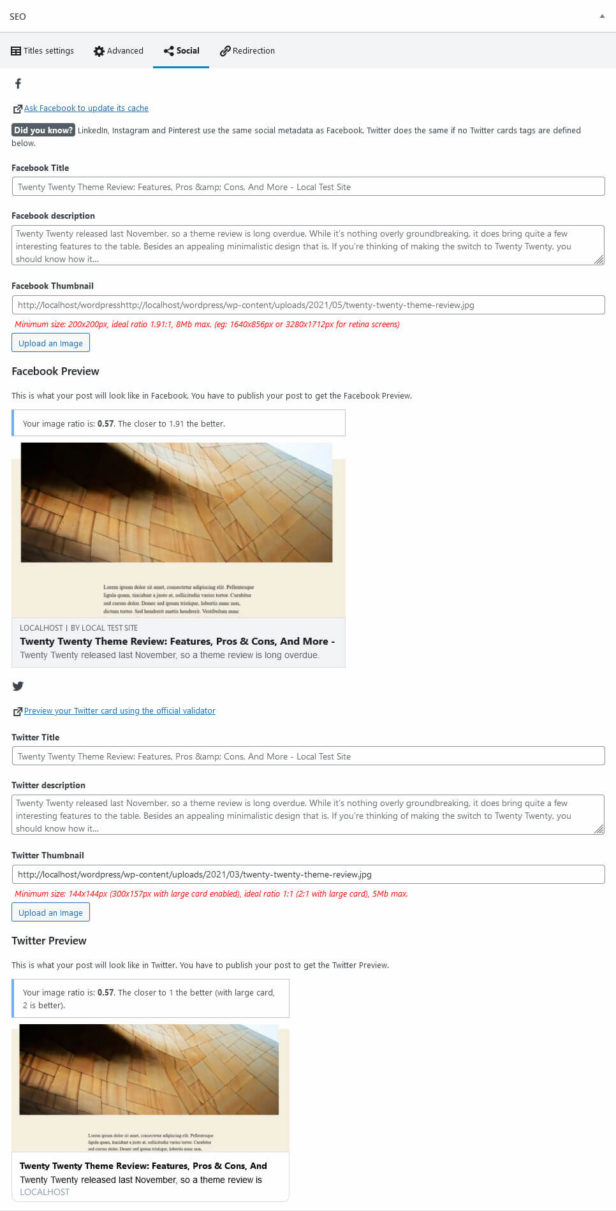
Here, the usual options await. You are able to set a custom title, description, and thumbnail for each platform. The plugin also displays a preview of what it will look like when shared. Note that SEOPress says the content has to be published in order for you to see the preview. If you want to be really sure, use the links to the Facebook and Twitter validation tools to check that the platforms recognize your markup correctly.
Check the Advanced Settings
Under Advanced, you find important settings for meta information and more.
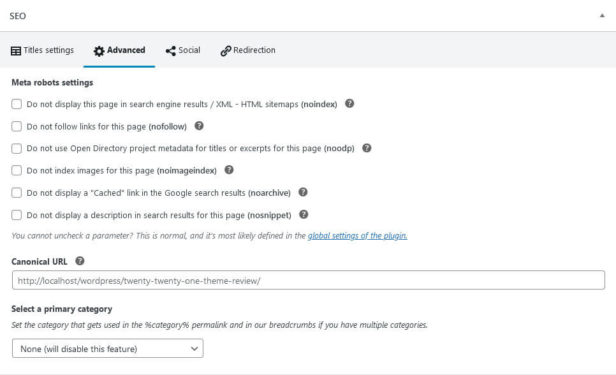
First of all, you can assign a number of meta tags to the post:
noindex— Keeps the content out of the search index and sitemapnofollow— Tells search engines to disregard all external links on the pagenoodp— Prevents the usage of the Open Directory metadata (no longer used by Google and Yahoo anyway)noimageindex— Lets search engines know you don’t want them to index images on this pagenoarchive— Enable this to prevent having your web page cached in searchnosnippet— Switch this on if you want to disable the page’s meta description in search results
The final two options are setting a canonical URL (in case this content is used somewhere else, to prevent duplication penalties) and determining its primary category (if you are using more than one) so that WordPress uses the correct category in its URL.
Set Redirects if Necessary
The final option in the SEO metabox is the ability to set up redirects.

Simply check the box to enable it, pick the type of redirect (more information about that here), and enter the address where you want to send visitors and search spiders. Save the post and you are done.
Review SEO Information With SEOPress in Bulk
With the plugin installed, when you check under Posts and Pages, you will see additional columns with SEO information.
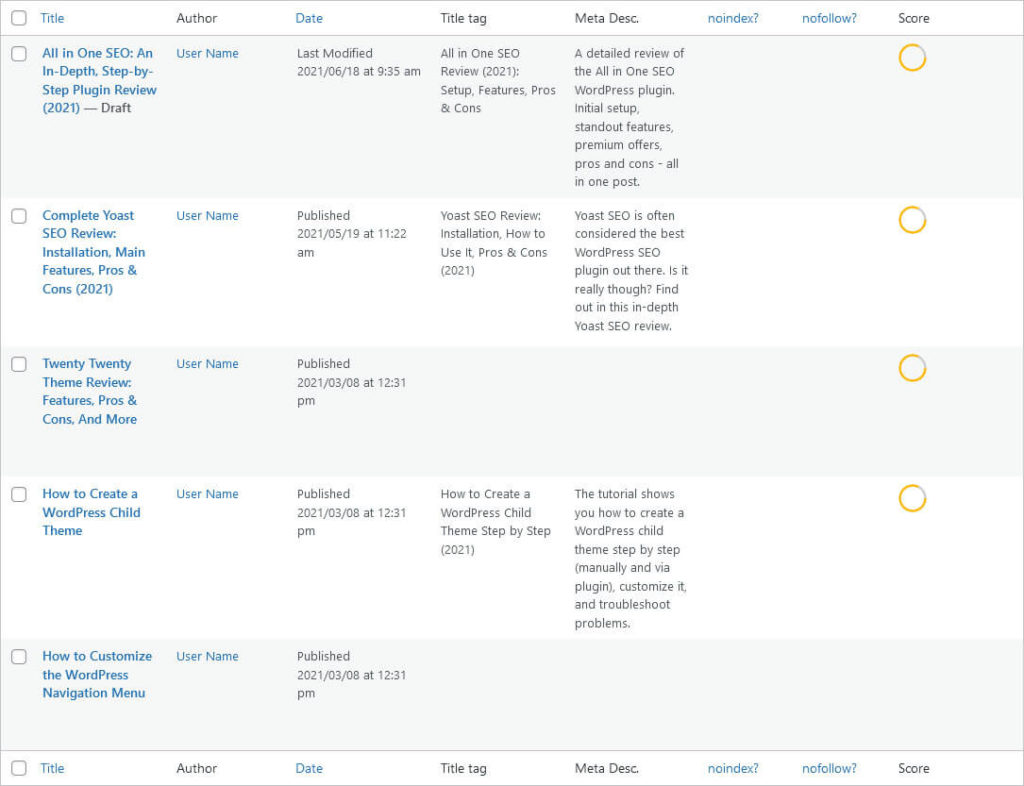
These will display the SEO title, meta description, whether the post is set to noindex or nofollow, and an SEO score. Use the Screen Options at the top in case any or all of these don’t show up for you. You can also remove and add which data you see here under Advanved > Appearance in the plugin options. We will cover that in detail below.
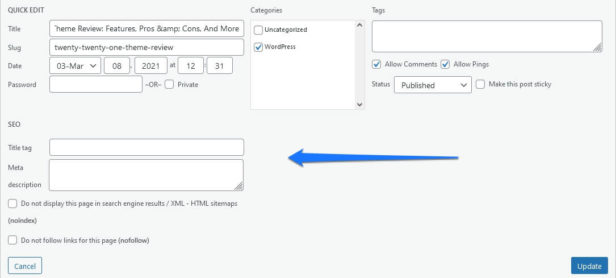
In addition, when you hit Quick Edit for a content piece, you also have the option to edit any of the above (except for the score, of course). However, at least updating the title and meta description didn’t actually work in my test.
Additional Features SEOPress Offers
Aside from the above, SEOPress has a number of other features that we will look at in the rest of the review.
Configure Titles & Metas
Like in other WordPress SEO plugins, Titles & Metas is where you can set title and description formats for different content types. The menu also contains controls whether to have search engines index them at all and other meta tag settings.
On the first page, you have possibility to define a separator symbol to use in your titles. In contrast to earlier examples, you are free to use anything, not just choose from a list. You can also define the search title and meta description of your homepage here.
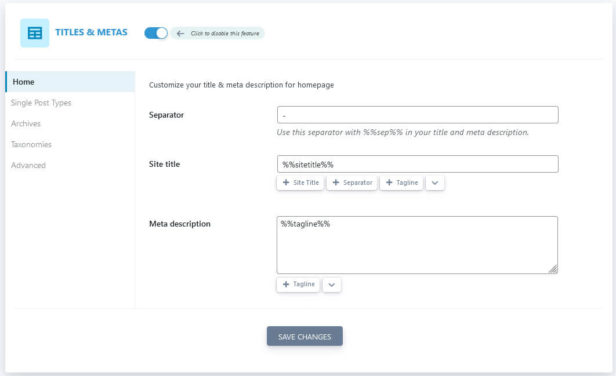
Either use a custom text or input variables to automatically add the site title, tagline, and more. This works the same way as for optimizing individual content pieces with the most common variables available on click.
Under Single Post Types, Archives, and Taxonomies you can then do the same for posts, pages, archives, and the 404 page.
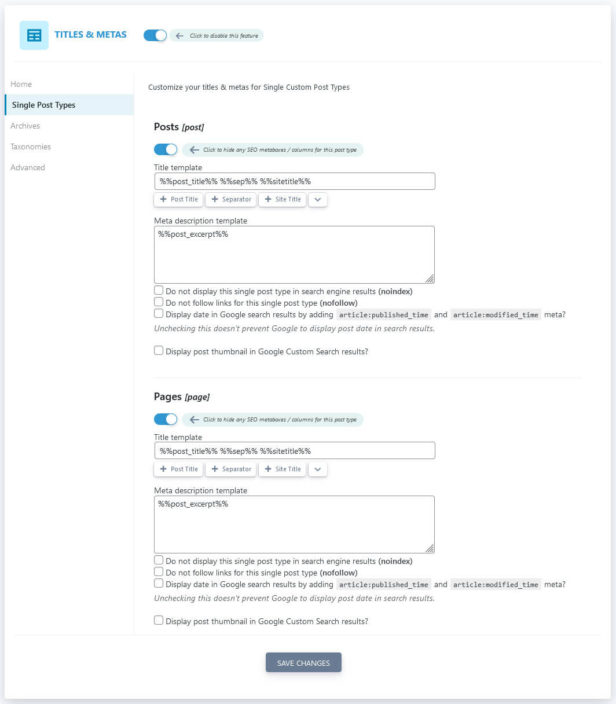
Here, it’s important to note that you also get check boxes to tell search engines not to index a content type, not to follow the links inside, add a publishing and modification date, or display post thumbnails in Google Custom Search (if you use it on your site). SEOPress also has a toggle switch at the top that allows you to disable SEO metaboxes and columns if desired. You can also disable the entire Titles & Meta feature at the beginning of the page if needed.
Note that there are reduced options for archives and that some of them, like author and date archive, are set to noindex by default. That’s because they often produce duplicate content, especially on single-author blogs.
Finally, under Advanced, you can define meta tags globally for all content on your site.
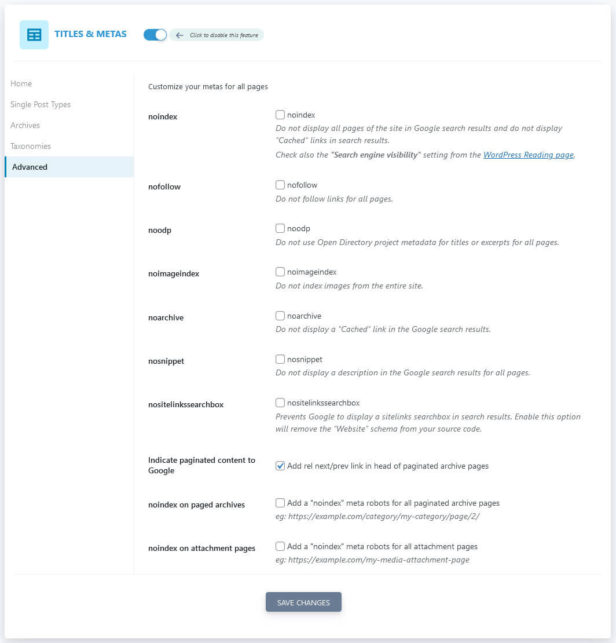
As you can imagine, you should be very careful with that because it can have great impact on your traffic. Besides the tags we already covered above, here, you additionally have options to disable the site search box in search results, tell Google about paginated archive pages, and set paged archives and attachment pages to noindex.
Take Control of Your Sitemap (Both XML and HTML)
Another common feature SEOPress has is the ability to generate a sitemap, which you can review under yourdomain.com/sitemaps.xml.
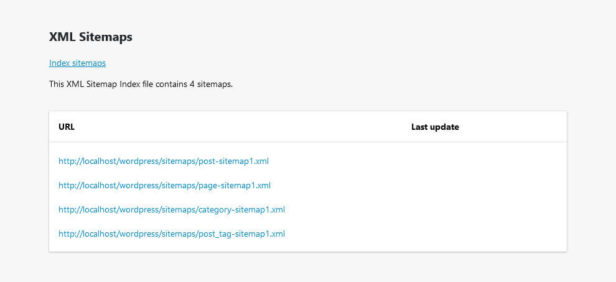
You can control everything to do with this feature under XML / HTML Sitemap in the SEOPress menu.
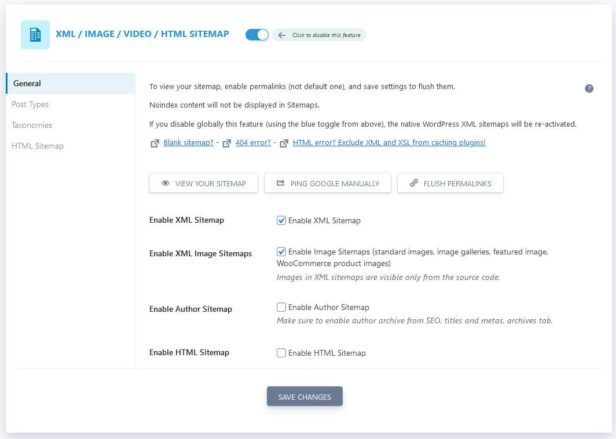
Use the button at the top to view the sitemap, ping Google about its existence, and flush permalinks to update it. You can also enable/disable the sitemap, determine whether to include images and author archives.
In addition, you may also switch on an HTML sitemap. In contrast to the XML sitemap, this is for your visitors, not search engines. The plugin also gives you options to display it on your site, as you will see below.
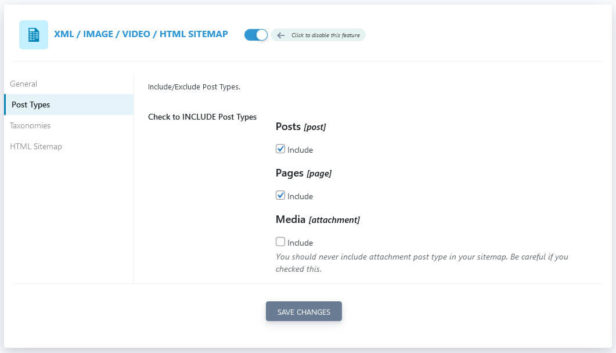
Under Post Types and Taxonomies you can basically only determine whether to include different content types in your sitemaps or not.
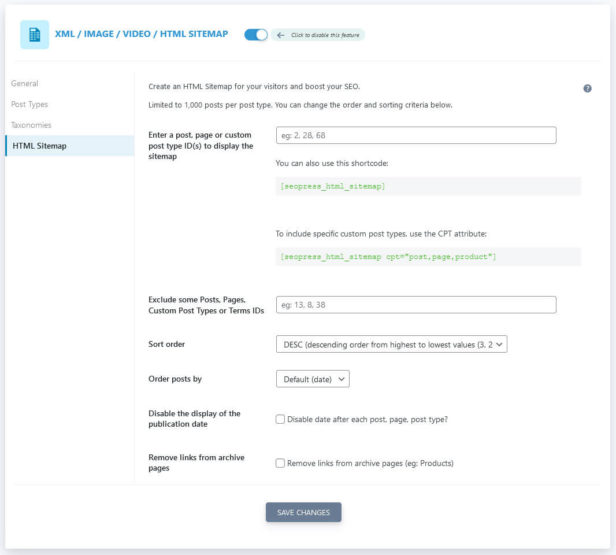
Finally, if you have switched on the HTML sitemap, you can configure it under the menu item of the same name. Enter ids of posts and pages where you want it to display and exclude content from the sitemap by entering its ids as well.
Side note: To find out your page ids, hover over the content name in the Posts or Pages menu and look at the link in the bottom corner of your browser window. It will contain something like ?post=12. The number is the page id.
Determine the sort order (ascending or descending), what to order posts by (date, title, modified date, etc.) and whether to disable the display of the publication date and remove links from archive pages. Finally, the menu also provides you with shortcodes you can copy to manually add the sitemap wherever you want it to display in your content.
Deal With Social Media Settings
Under Social Networks, you can configure similar things as in Titles & Meta but for your social presence.
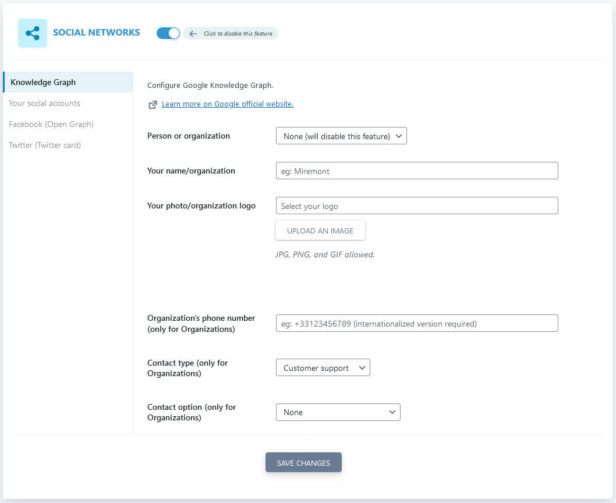
On the first page, you can fill in all the Knowledge Graph information. This includes whether your site belongs to an organization or person, its/your name, and photo or logo. For organizations, you can also fill in a phone number, the type of contact it leads to (customer support, technical support, sales, etc.) and contact options (toll free, support for hearing impaired callers).
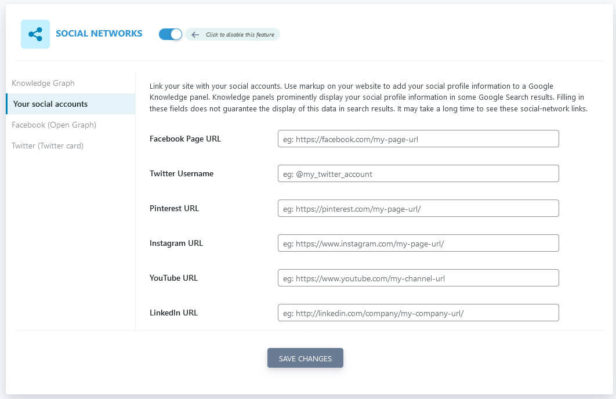
Under Your social accounts, you have the ability to enter all social profiles belonging to your website. That way, they might also be displayed in search results.
Facebook (Open Graph) contains all the options to customize your site information for Facebook and other social networks that use the Open Graph format.
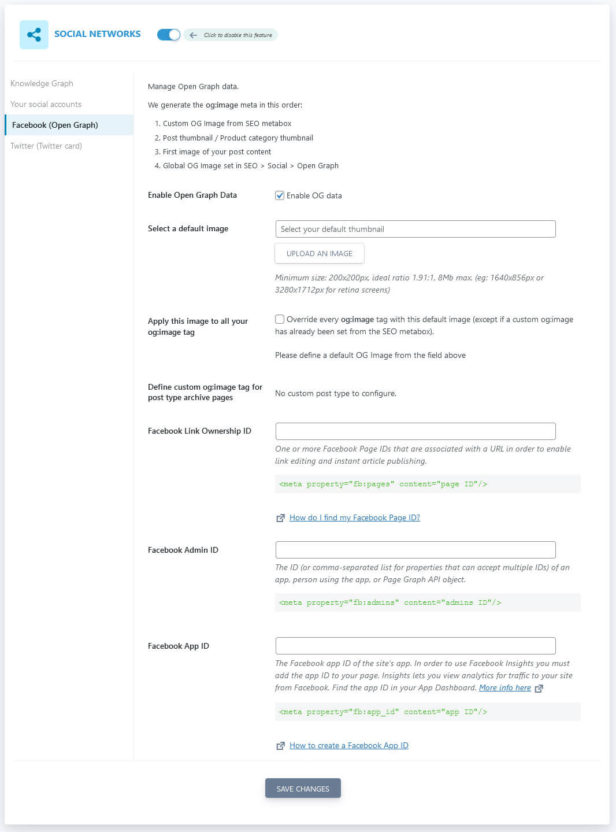
You can set a default image to display when none else is present and also determine to use it always. In addition, you have the ability to define Facebook Ownership ID, Admin ID, and App ID.
Finally, under Twitter (Twitter card) you can define a default Twitter image and pick which type of Twitter card to use. You can also tell it to use the Open Graph data for Twitter as well.
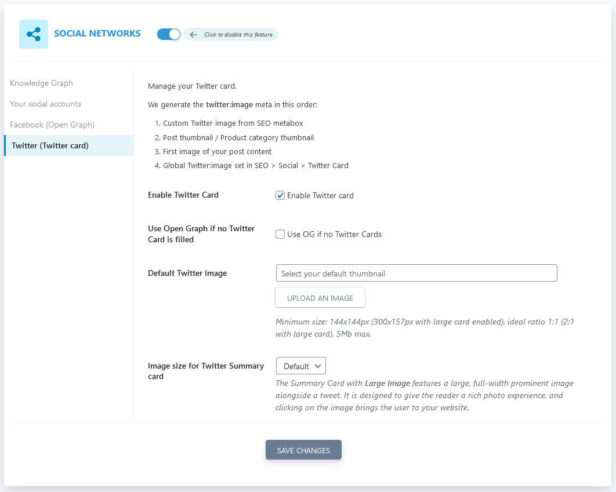
Review SEOPress’ Analytics Options
Under Analytics, unsurprisingly, SEOPress has placed controls for configuring web analytics.
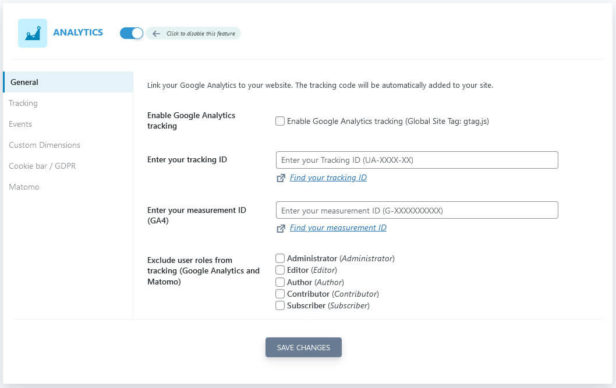
The first page allows you to enable tracking through Google Analytics (both normal and Google Analytics 4), enter your respective tracking IDs, and exclude user roles from being tracked.
- Tracking — Contains options to further customize website tracking. You can enter a Google Optimize ID for A/B testing, include additional tracking codes (e.g. for Facebook Pixel) in the
head,body, andfootersection, and more. The most important setting here is the option to anonymize user IP addresses. - Events — Configuration options if you want to track events on your website.
- Custom dimensions — Helps you create custom dimensions to record on your website and connect them to Google Analytics and Matomo.
Something that’s super useful is that SEOPress comes with a built-in cookie bar option. Due to GDPR, it’s a must these days due to have users opt in to cookies to allow being tracked. You find options for that under Cookie bar / GDPR.
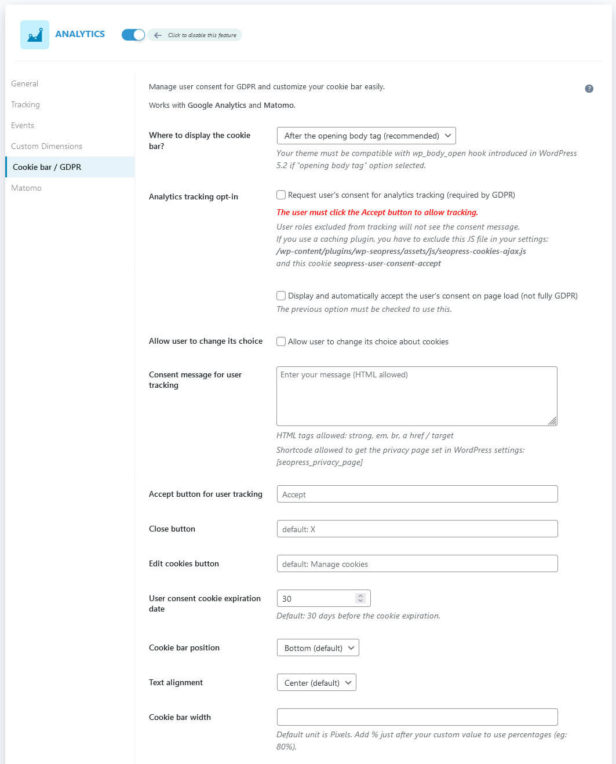
Options include where to place the code, enabling user opt-in, and defining the consent message, labels for buttons, and cookie duration. It also has controls for the bar design. You can determine where to display it on the page, text alignment, width, and background and text colors.
Here is what it looks like on the page:
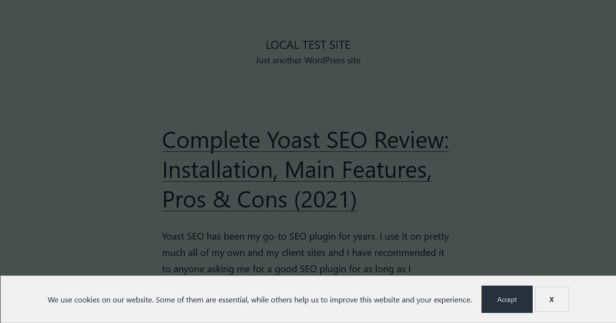
This is pretty cool, considering that you often need an entire plugin just for this functionality, here, it comes included.
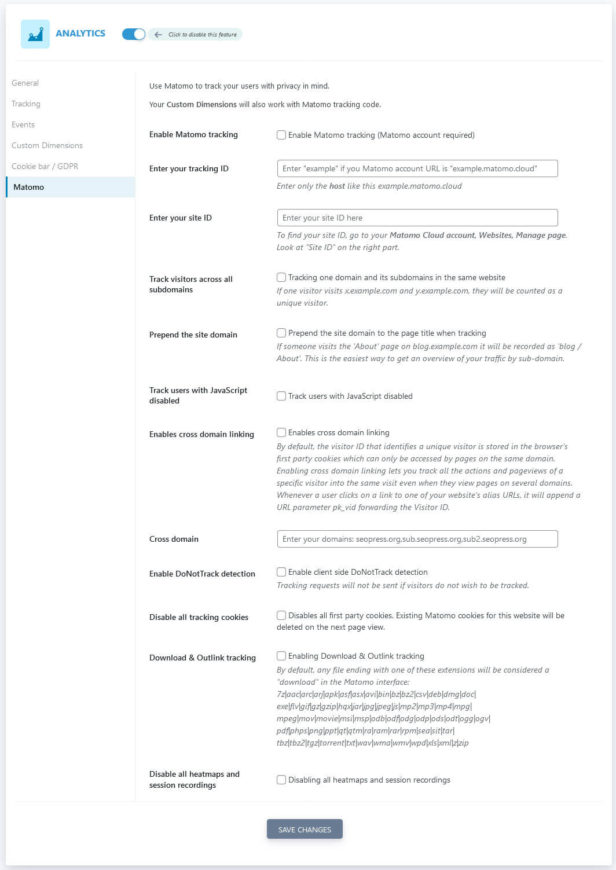
The final option is Matomo, which is the name of an alternative to Google Analytics. The page contains all the settings to switch it on and use it on your site.
Don’t Forget About the Advanced Options
Next up in this SEOPress review is the Advanced menu, which contains a number of miscellaneous options. Let’s go through them one by one.
The first section is Image SEO.
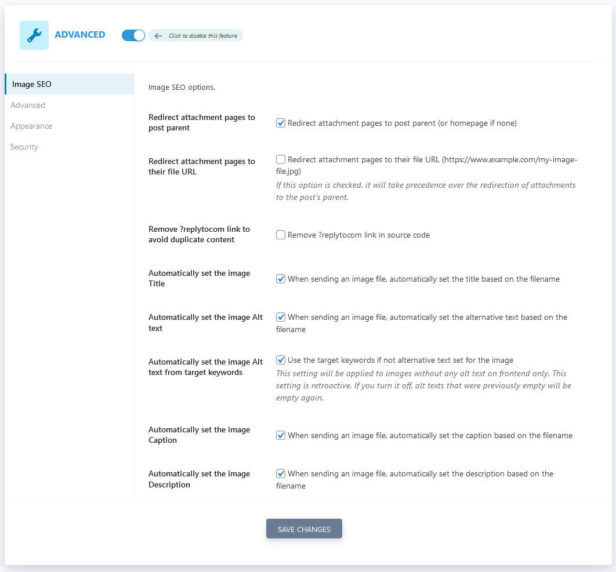
Here, you can redirect image attachment pages to either the pages that contain the image or the image file. Another option is to remove the ?replytocom link, which can cause issues with duplicate content. The rest are options to have SEOPress automatically generate an image title, ALT text, caption, and description from the filename. You can also configure it so that it uses the target keyword as the ALT text if none is present.
Unfortunately, except for the auto-generated ALT text from the target keyword(s), I could not observe the other intended behavior. So, unless I made a mistake, I’m not sure this works properly. The SEOPress documentation is, again, woefully lacking.
The Advanced section contains a whole number of options that have to do with cleaning up the code output.
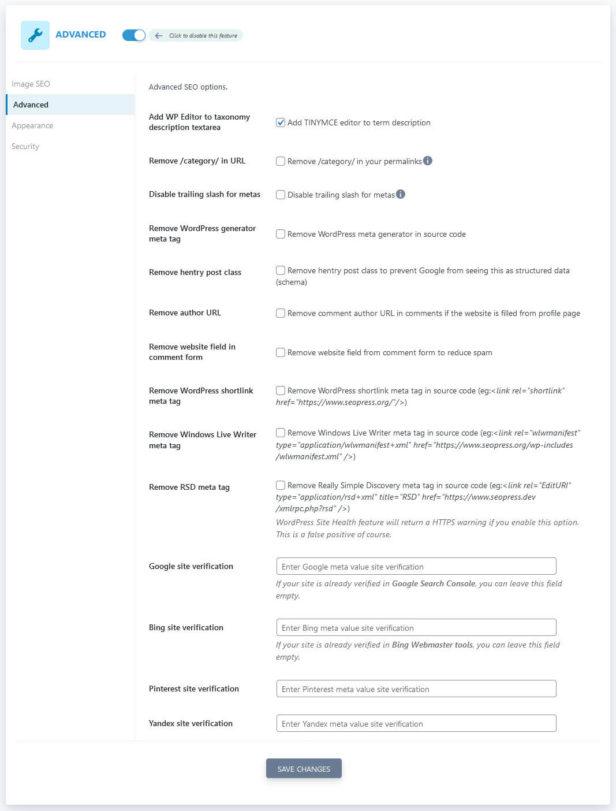
This is a little too nitty gritty to cover completely here. The most important parts for most users will be the options to remove the /category/ base from archive URLs and enter verification codes for Google and Bing Webmaster Tools as well as Pinterest and Yandex. Unfortunately, you can’t find anything about the rest in the SEOPress knowledge base either.
Moving on to Appearance, here, you can customize a lot of what information and tools the plugin will display to you.
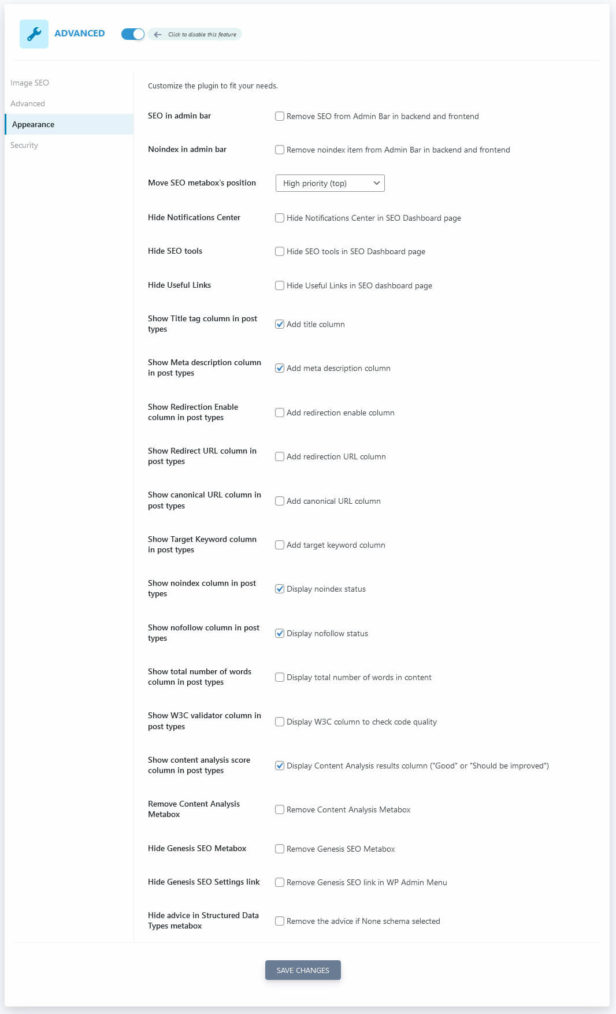
This ranges from whether you see the SEOPress menu in the admin bar, where to place the SEO metabox in the post editor, what to see in the SEO dashboard, and what information to display in content lists.
You can also completely remove the content analysis metabox and some SEO options of the Genesis theme (if you are using it). It’s worth checking out to make the plugin more your own.
As the final option of the Advanced menu, under Security, you find similar access control options as Rank Math’s role manager.
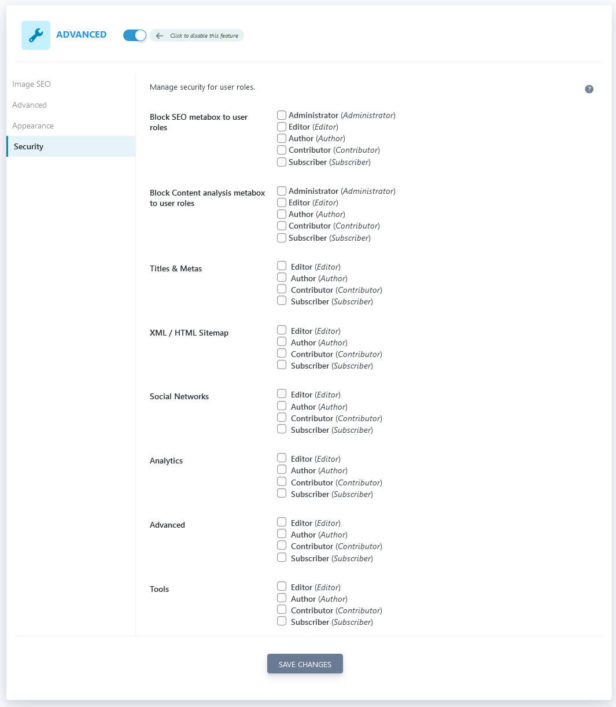
With simple check boxes, you can block and enable different parts of SEO functionality and menus for different user roles on your WordPress site. It’s pretty self explanatory, so I am sure you will figure it out.
Last But Not Least, the SEO Tools
The final menu item of SEOPress left to review is Tools. Here, you first find the Compatibility Center.
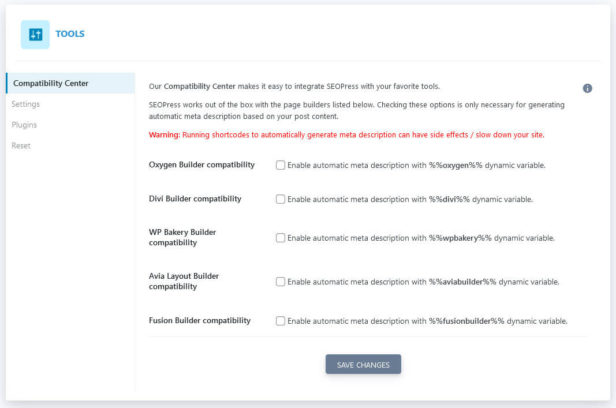
If you are using some of the more common page builder plugins like Divi, Oxygen, or WPBakery, you can enable a compatibility mode for them here. This helps generate proper meta descriptions from post content. They will work without but this is just the cherry on top.
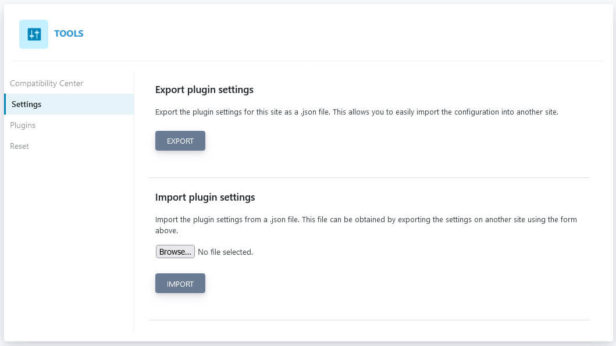
Moving on, under Settings you can export and import plugin settings. A helpful options if you want to use the same configuration across different websites.
Plugins contains the option to import data from different SEO plugins as already seen in the onboarding client.

Again, pick from the drop-down list and click Migrate Now.
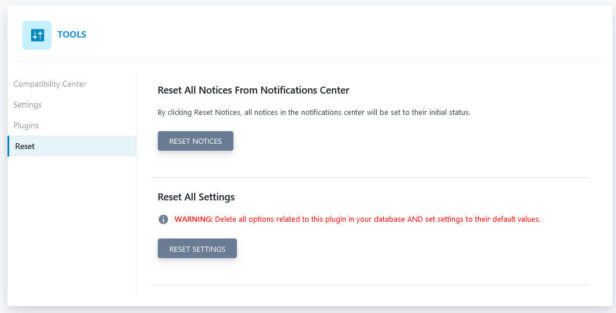
Finally, Reset allows you to reset all SEOPress notices and settings.
SEOPress Premium Version: Feature Review
Alright, now that we have covered all the options of the free version, it’s time to turn to what SEOPress can offer in the premium department. In the case of this plugin it’s called SEOPress Pro.
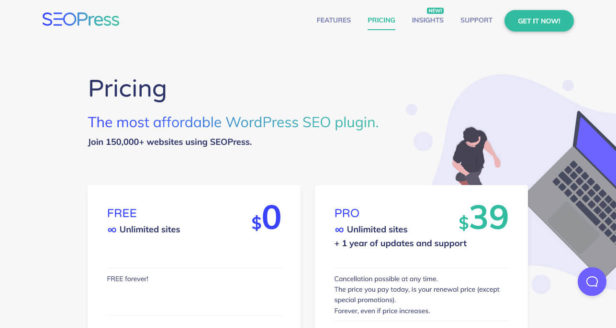
A license costs $39 (as you can see above, SEOPress advertises itself as “the most affordable WordPress SEO plugin”) and gives you one year of updates and support. You also get permission to use the premium plugin on as many websites as you want. Plus, cancellation is possible at any time, there is a 14-day money back guarantee, and the plugins renews at the same price you paid, no matter if there was an increase in the meanwhile. Those sound like pretty fair conditions if you ask me.
What do you get in return? Besides the features of the free version, SEOPress Pro contains:
- 404 monitoring and the ability to set 301 redirects
- Broken link checker
- Breadcrumbs
- Editors for
robots.txtand .htaccess - Support for WooCommerce and Easy Digital Downloads
- Google News and Video sitemaps
- Google structured data types, Dublin Core, and custom Schema data
- Enhanced ecommerce data for Google Analytics and web analytics stats in your dashboard
- Ability to import and export SEO data as well as redirects via CSV file
- White label option
By the way, some of the above is guesswork from the keywords on the sales page. There are also a few, namely Google Local Business, Google Suggest, Google Page Speed, and URL rewriting, for which I am not 100% certain what it is they describe. I really wish some SEO plugins would be more explicit on their feature pages instead of just rattling down random catchwords without explaining what they mean. Anyway, these are the features and if their quality is as good as the rest of the plugin, they are probably worth the money.
Pros and Cons of SEOPress
As usual, in the final part of the review, I will give a summary of the advantages and disadvantages of SEOPress.
The Pros Section
Let’s start with what’s great about the plugin. Here, we first have to talk about the user interface. It’s well designed, clean, and spacious, making the plugin easy and pleasant to use. This impression is further underscored by the excellent onboarding wizard that lets you configure all the most important settings.
I also really like the notifications center. It’s a great reminder of important SEO tasks inside and outside of the plugin. Then there is the modular build of SEOPress, which we have also seen in other plugins and that allows you to use only what you need and want.

In addition, the on-page SEO metabox is really solid. I especially like the way it shows the title and description length and the fact that you get a preview for both search and social appearance. In addition, the content analysis goes beyond that of some of the other plugins I have looked at.
One standout feature of SEOPress is that it comes with the ability to create a configurable cookie opt-in bar. As mentioned, this is often a (paid) plugin all by itself. It’s pretty impressive that, here, it comes as a free feature. In addition, I also like that SEOPress offers more analytics integrations than just Google.
The rest of the plugin is pretty much par for the course. It’s well done and up to the standards of other popular solutions out there. While I can’t say anything about the premium version, its pricing seems more than fair and, from what I have seen in the free version, I would be confident that they deliver quality.
Now the Cons
As for things I think could be improved, I already mentioned that having the meta box for on-page SEO at the editor’s bottom is a bit impractical, especially on really long posts. In addition, I found that the title and description preview had problems outputting some characters. For example, it turned ampersand (&) and apostrophes into HTML markup.
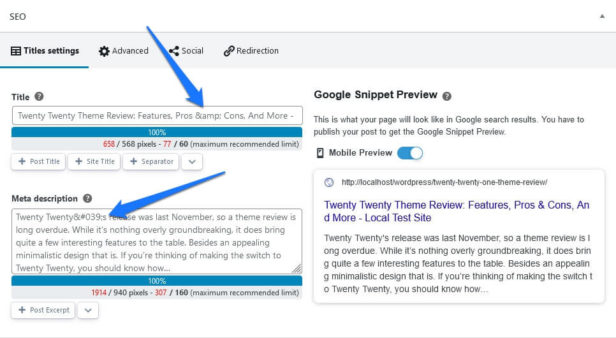
They didn’t appear on the page like that but it’s still confusing enough that I had to check.
In addition, I found the content analysis display a bit impractical. The fold-out menus keep closing on refresh, so you have to open them allover again. In addition, the list view is a bit overloaded and overwhelming at times.
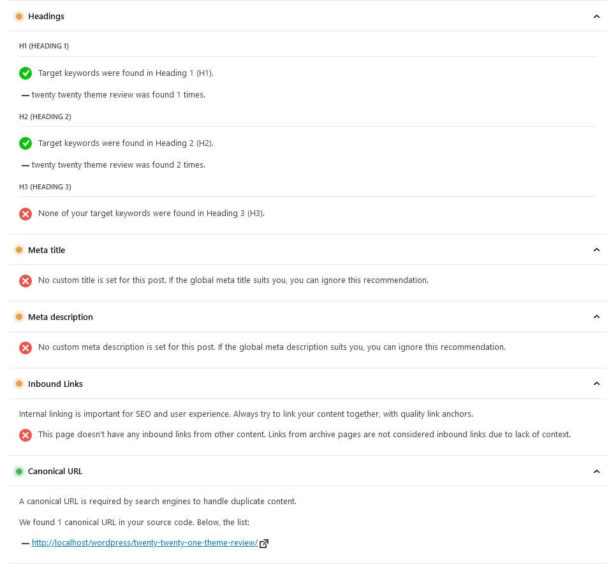
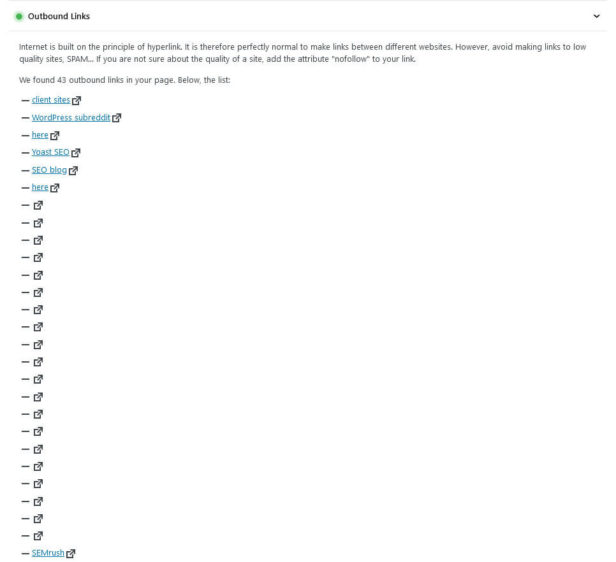
For example, the outbound links section is very long and sometimes full of empty links, which I didn’t understand. So, I think overall this part could use some improvement design wise.
I am also not so sure about the optimization for multiple keywords. When I added more focus keywords, the optimization level never changed in any way and there is also no information on this out there from SEOPress. So, at this point I’m not even sure if or how this feature works. The same applies to most of the automated image SEO functionality. I also already mentioned that updating SEO options via Quick Edit didn’t work for me.
Lack of information is also a general problem that popped up during the SEOPress review, the documentation situation could definitely be better. On multiple occasions was I looking to clarify some detail but couldn’t find anything about it, not even through Google.
I have also already mentioned above that I think the premium offer is a bit unclear and very buzzword laden without explaining what you actually get. If someone with 10 years experience in writing about SEO and online marketing isn’t entirely sure what hides behind some of them, others probably feel the same.
SEOPress Review: The Verdict
To be honest, since I had never heard about SEOPress and the user base seems rather small in comparison, I didn’t expect that much. However, I was pleasantly surprised to find a very solid, well designed SEO plugin with a decent feature set. I didn’t expect to like it as much as I did.
While it’s rather compact and doesn’t have as many bells and whistles as other plugins, it does what it does very well. I could find very few things wrong with it. Most were usability or design flaws but nothing major.
As a consequence, I think it definitely deserves a spot among the best WordPress SEO plugins. I absolutely recommend it to anyone looking for lean product with all essential features to properly optimize your site for search and social media.
What are your thoughts on SEOPress? Anything to add to the review? Let me know in the comments!

Leave a Reply